EARLY POPTROPICA ISLAND
- Go all the way to the right until you arrive in Early Poptropica.
- Talk to the settlers. One of them says he is missing his pig and that a spider stole it.
- Another settler complains about a stolen bucket for the well.
- There is one more settler on top of the tower. He says they have lost their flag and need it back.
- Go all the way back to the beginning and you will see an open sewer grate by a fire hydrant.
- Go down inside the sewer and get the pig in the bottom right corner.
- Go back out of the sewer and get back onto the street.
- Find the guy who was missing his pig and click on him. He will take his pig back.
- Go down the well.
- Find the glow stick. It is in the upper-left corner.
- Go back up and get out of the well.
- Go left back to the start.
- Now you need to keep going left and get to Poptropica Towers.
- Find another pothole and go down.
- Explore the sewer maze below the street until you find a golden egg (hint: watch the walkthrough video for the exact path to take).
- Get the egg.
- Work your way up the buildings until you get to the last one.
- Get to the top of the last one and go up the vine.
- Click on the giant.
- Keep on going right until you find a bucket and a jetpack.
- Once you find those items go back down to the street.
- Go back to Main Street and with the jetpack fly to the top of the water tower and retrieve the flag.
- Go back to Early Poptropica and give the man by the wall his water bucket.
- Go up to the tall wooden tower and give the man his flag.
- A ship will come to shore and you need to click on the man on the ship to get your medal.
_______________________________________________
SHARK TOOTH ISLAND When you arrive on the island, head immediately all the way to the right and follow the sign to the Ancient Ruins. You can stop by and visit some of the buildings like the Shark Museum on the way, but they’re not necessary for completing the mission. Go through the next short room and head to the right. You’ll arrive in the ancient ruins. Go all the way to the right and watch out for the dropping coconuts as you go. Go to the end and you’ll see a sign for Booga Bay. Go right again and head for the bay.


WIMPY WONDERLAND ISLAND
RED DRAGON ISLAND
(I'AM SORRY THE WALKTROUGH IS IN THE VIDEO WALKTROUGH)
______________________________________________________________________________________________
SHRINK RAY ISLAND


MYSTERY TRAIN ISLAND


Go right through this short room and then you’ll arrive in lovely Booga Bay. Talk to the first guy you see at the Grass Skirts stand. He’ll give you a grass skirt so that you will look like a native islander. Put on the grass skirt and then head back left to the ancient ruins. When you arrive in the ruins, jump over the big stone in the middle so that you are standing on the left side of it and then push it to the right until it is underneath the vine right next to the palm tree. Now jump up on the top of the block. Watch out for falling coconuts and then jump up again to catch the vine.
Continue climbing up the vine and jumping up on the platforms on the tree until you get to the very top, where you’ll find a medicine man. He will talk to you because you look like an islander in your grass skirt. Click on him and ask him, “What else can you tell me?” He will tell you that deep in the temple there is a wall carving that will show you what you need to bring to him so that he can make a potion that will put the big shark to sleep.
Jump off the platform and keep going down until you reach the ground. Walk a short distance to the left and you’ll see the entrance to the temple. It is in the mouth of the big statue and has spider webs in it. Go inside and then jump down the platforms in the first area.
Soon, you’ll be standing on a platform and there will be a swinging platform to your left. Time your jump so that you land on it and then keep moving to the left. You’ll reach a wall and then will need to go all the way to the bottom. Watch out for the purple bats, who will knock you over. Once you get to the bottom, go left and then jump all the way up again. Soon you’ll see a big green control panel in the upper left corner. Jump up onto that platform and click on the panel.
This panel will open the door to the left, but only if you press the correct teeth in the mouth. Counting from the left, you need to click on the 3rd, 4th, 6th and 7th teeth. Then press the big triangle above the teeth and between the two eyes. The door will open and you can go through it to the left. Keep going through the next passage and you’ll arrive inside a large chamber with a green vine hanging down. This one works a lot like the chamber before. Just jump onto the vine and drop all the way down to the bottom. Go left some more and you’ll come up to a big golden statue of the shark. Jump up on top of that statue and then over it. At this point, you can either jump up onto the swinging panel above you and keep going left, or just head straight across. If you jump up, you’ll get to a small pit with spikes in the walls. Jump down here and you’ll land next to an old skeleton with a bone in its mouth. Walk over to the bone to pick it up.
Now head right and go back to the shark statue. Climb back up to the top and jump on the swinging platform and go left until you get to the pit with the spikes in the walls. Wait here for the sliding platform to come close and then jump on it. Ride it to the other side of the pit and then jump off and exit to the left. Go through the passageway and you’ll arrive in another chamber with a green vine. Just jump down here and run across the floor until you get to a giant pedestal with an urn holding some green stuff in it. Jump up on top of that and you will get the Key Ingredient. There’s a vine here. Jump up onto it and climb up to leave the chamber. You’ll be in a small room with platforms. Keep jumping up to the top and then exit.
You’ll appear out of a hole in the sand right at the beginning part of the island next to the guy selling shark fins. You can get one from him if you like, but you don’t need it to solve the mission. Now walk to the right a little and talk to the guy standing next to the booth outside the Coconut Cafe. He will give you some carbonated coconut milk, which is the 3rd and final ingredient you need to bring to the Medicine Man.
Now go to the right and head for the ancient ruins. Push the stone in the middle back underneath the vine next to the tree and go back up to visit the Medicine Man. He will take all of the ingredients and create a potion for you. You’ll get the Calming Potion from him, which can be used to calm the Great Booga Shark. Jump off the tree to the right and head to Booga Bay.
After you arrive in Booga Bay, go to the right until you pass a fisherman and arrive at a cannon with a sign next to it that says, “Feed the Shark.” Click on the cannon and point it up in the air and then click again to launch the coconut with the potion in it into the bay. As soon as it lands in the water, the great Booga shark will appear and eat it. He’ll turn green and then fall asleep below the water. Click on the “Back” button in the upper-right corner of the game to return to the main screen. Now you can safely cross the water while the shark is sleeping. Cross the island and you will come to a small island. Go right at the end and you will then arrive next to Professor Hammerhead.
Talk to Professor Hammerhead and he will thank you for rescuing him and the boy and ask you to lead them back to the mainland. Head to the left again and back across the water. Both the professor and the boy will follow you. When you arrive back to where the crying woman is standing, she will thank you for rescuing her son. Professor Hammerhead will then give you a gold medallion and you have completed the adventure. Congratulations!
__________________________________________________________________________________
TIME TANGLED ISLAND
The Arrival
You will arrive on a beach. Walk to the right and there will be a building that says Party Time Tower. This is a multi-player room. To do this adventure, keep on walking. There is a crying lady standing outside of a building called,Pendulum’s Lab. Click on her and she will tell you about your mission. When she goes into the building, follow her inside.
Walk to the right until you see the lady again. Talk to her again. Now she will give you a mission printout that you can read in your items inventory. If you want to learn more about the Future Machine, talk to the man that’s wearing glasses and an apron.
To power up the Future Machine, go left and down to find the power supply. Push it together by walking towards it until it closes to activate it.
The Future
Walk back to the door of the Future Machine, which will be pulsing blue, and click on it to enter. The future will be in ruins. You will meet yourself but 50 years older in the future. Talk to future you and you will get a special time travel device that looks like a golden stopwatch. There will also be a sign in the future that says:
It wasn’t supposed to be this way! Something happened in the past that ruined mankind’s future. Can you turn back the hands of time and make things right?”
Tips and Help
When you finish helping everyone, go back into the future. Use the hover tube and monorails to get to your future self’s SkyHome. There, talk to your future self and they will give you the Time Twisted Island Medal.
Time Periods
- 2009 AD – LAB – Main Street
- 0328 BC – man in golden armor – Ancient Greece
- 0831 AD – man in Viking suit – Vikings
- 1387 AD – lady with pink turban – Mali Empire
- 1516 AD – bearded man – Da Vinci’s Workshop
- 1519 AD – man with headdress – Aztec Empire
- 1593 AD – armored Asian man – Great Wall of China
- 1776 AD – man with black hat – The Graff House
- 1805 AD – man with beaver cap – Lewis and Clark
- 1877 AD – young man – Edison’s Workshop
- 1882 AD – French man – Statue of Liberty
- 1953 AD – man in blue hoodie – Mount Everest
Who Needs What
- Ancient Greece: Golden Vase
- Vikings: Thor’s Amulet
- Mali Empire: Salt Rocks
- Da Vinci’s Workshop: Notebook
- Aztec Empire: Sun Stone Piece
- Great Wall of China: Stone Bowl
- The Graff House: Declaration of Independence
- Lewis and Clark: Peace Medal
- Edison’s Workshop: Phonograph
- Statue of Liberty: Statue Model
- Mount Everest: Climbing Goggles
Where Things Are
- Climbing Goggles: In the Aztec Empire, and a guard is wearing them, the guard will give them to you if you are wearing the Warrior’s Mask( see last list).
- Statue Model: The very top peak of Mount Everest you can get to.
- Phonograph: On top of the treasury building( the guards are standing in front of it) in Ancient Greece. You have to climb up onto the building that the Oracle(a person) is in. It helps to have the Glider when getting it( see last list).
- Peace Medal: Hanging on the pulley system in Da Vinci’s Workshop. First climb onto the middle platform, making the top one come closer so you can jump on it. Get on the top platform, you will go down but the bottom platform will come out. Jump onto the bottom platform and from there jump and try to touch the shiny silver circle. If you touch it, then you’ve got the Peace Medal.
- Declaration of Independence: In the Mali Empire( watch out for snakes) there will be a place called “Timbuktu Inn”. A document merchant is in there. Piece together a puzzle for him to get the Declaration of Independence.
- Stone Bowl: Go to Lewis and Clark’s campsite. There will be a tree that has the words “Clark was here” cut into it. Climb the tree and wait for a beaver to come out, he has the bowl on his head.
- Sun Stone Piece: On top of Edison’s Workshop. Go to the left and jump on the car. Click the circle-thingy that lights up and the car will go and stop under the tree. Climb up the tree and onto the house.
- Notebook: Go to the Statue of Liberty. Climb so your on the very top platform of the wooden stilts. Jump to your left. You will land on a ledge. The Notebook is on the ledge below that.
- Salt Rocks: If you go to the Graff House and climb the tree, then jump onto the roof, they are in a bag right there.
- Thor’s Amulet: Go to the Great Wall of China and pass the construction zone. A man will be wearing the amulet. If you beat him in a memory game he will give it to you.
- Golden Vase: This is most definitely the hardest. Go to the Great Wall of China and pick up a barrel of explosives. Go to where the Vikings are and climb onto the first cliff. Click the rock-pile and run. It should blow up. Pick up the torch and go inside. You only have a little while before your torch goes out to find the vase. It will also go out if you step in water.
- Clothes You Can Get:
- Warrior’s Mask: In the Aztec Empire there is an old warrior who wants to retire. Talk to him and he’ll give his mask to you.
- The Glider: Da Vinci gives it to you when you give him his notebook.
- The Viking Suit: It’s laying on the second cliff where the Vikings are, use the Glider to get there.
Special Tip: The Viking Cave
One of the hardest parts of Time Tangled island is the inside of the cave in the Viking area. When you enter the cave, you only have about 30 seconds until your torch flickers out. Since you can only see part of the way, there’s not a lot of room for error. But here’s a great cheat: the complete map of the inside of the cave. Follow this path to get down to the bottom quickly, where you’ll find the Golden Vase, which you need to return to Greek Times.
Here's the path to follow when you're inside the Viking Cave on Time Tangled Island.
Trivia: Time Twisted Island
Did you know that the original name of Time Tangled Island was Time Twisted Island? In the earliest days of Poptropica, the map contained an image of the island and the title was Time Twisted Island. There was even a logo made for it and it said, Coming Soon. When the island was released, the name was changed to Time Tangled Island.
______________________________________________________________________________________________
24 CARROT ISLAND
Entry Area and Carrot Farm
As soon as you arrive on 24-carrot island, go left to the Carrot Farm. Walk past the farmer and jump up onto the roof of the house and then go down the chimney. When you get inside the house, go to the right past the couch and you’ll get an Empty Bowl. Now go back up the chimney and outside the house. Go right to return to the starting area. Go to the right and then head inside the Carrot King Diner. Talk to the waitress right by the door and ask her to fill your bowl with milk. Then go back outside and return to the Carrot Farm. Go back into the house through the chimney.
This time, go to the right. You will automatically place the bowl of milk on the floor where you picked it up. Go to the right and jump up onto the second floor and then run to the left over to where the bathtub is. Turn on the water in the bathtub and a cat will jump out of the tub. Walk slowly behind him to “chase” him downstairs and then follow him there. He will see the bowl of milk and drink from it and then Meow. Now he’s your friend for life and will follow you anywhere. Go back outside the house and head right to the main entry area.
Now go right past the diner and the theater and go into Charlie’s Carrot Surplus Co. Walk to the right and talk to the woman standing next to the counter wearing the apron. Tell her you found her cat (his name is Whiskers) and then she will give you a crowbar.
Go back outside and run to the right. Follow the sign to the Factory. When you get there, keep running to the right. Jump up the left side of the factory to the roof and you will find the Vent Blueprint. You don’t really need it but it can help you navigate the vents inside the factory if you get a little lost. Jump down the right side of the building and you’ll see a pipe near some old barrels floating in the water. Since you have the crowbar, just click on the lid of the pipe and you will pry it open. Then you will head inside.
Getting Into the Factory
Run left through the pipe and pick up the Carrot Transporter. You won’t really need this either, but it’s cool to have. Now jump up the left side of the pipe and then right to the right back over the valves that open and shut. The trick to get over these is to stand at the edge and be patient. Start running just as they’re closing and do one at a time. Some of them are tricky because they open and shut pretty fast.
Keep going and you’ll see a giant rat. He’s very easy to avoid if you jump up into the little section of pipe that goes above. You can go down the other side and keep going left. Jump up through the top and you’ll be inside a dark room inside the factory.
Inside the Factory
The Machine Room
Run over to the left and stand in front of the Master Engine panel. There are three levers on the machine and they are all in the up position.. Move the left lever so that it is midway between up and down. The little green light above it will light up. Move the middle lever all the way down and the right lever to the same position inbetween up and down as you did with the lever on the left. All three green lights will light up and then the main lights in the room will go on and the master engine will start moving.
Head over to the right side of the room and jump up on the boxes. Jump up to the left onto the platform and then onto the top of the three barrels. A giant mechanical arm will come by and when it does, jump up onto that. It will come to a platform on the right and when it does, jump off onto the platform and enter the open vent.
The Vent
The vent is a little bit like a maze where you can only see a little bit in front of you as you go. It’s pretty easy to get through and if you get stuck you can just ue the vent blueprints that you found outside. Head down and to the left and keep going until you see part of the passageway that is covered in ice. Go up and through that passageway and then down the other side. You’ll quickly come to where there is a pair of wire cutters on the ground. Run over them to pick them up. Keep going down and to the right and you will arrive at another grate in the vent. Click on it to go through.
Security System
You’ll arrive on a platform with a sign that says Security System and where the word enabled is lit up. Jump down onto the floor and very quickly a flying security robot will find you and then zap you. You’ll turn white and disappear and then emerge in a refrigerated room. Over to the right is a panel labeled Security System. Click on that to use the wire cutters. Cut all three wires (red, green and yellow) to disable the system. Now go to the right and jump up to the top where there is a grate you can exit to go back into the Vent.
Packing Room
Jump up into the vent and head up and to the right. You should quickly come to a new vent grate. Go inside and you’ll be in another room of the factory where the carrots are put in crates. You need to jump through a few open chutes where carrot crates come flying through. Stand on the edge of each chute and wait for the crates to stop falling before proceeding to the next one. The crates come in groups of different numbers. It’s easy to figure out the patterns if you’re patient and make it all the way through. Go to the right and jump down onto the factory floor. Then go left.
Soon you’ll find a girl wearing a set of metal rabbit ears and strange swirly glasses. Click on her and say, “Hey, What’s that behind you?” You’ll see a close-up of the top of the rabbit ears. There’s a little power button in the middle. Press that to turn the ears off and the girl will no longer be under their hypnotic power. She will get a printout from the giant machine that gives you the system password for the computer which is: fuzzybunny. Now go a little to the left and jump back up to the vent grate where you entered. Click on it to go back into the vents.
Return to the Security Robot Room
OK now you want to head back to the same place you were in before where the security robot zapped you so use your vent blueprint if you need to and get back to that same entrance and go inside.
Because you disabled the security system, the robot will not bother you. Go to the bottom right where you see a doorway and a sign that says, “Authorized Bunny Drones Only” When you try to go through the door, you will drop through a trap door in the ground because you are not an authorized bunny drone. That’s ok, we’re about to take care of that. You will land in a new factory room. Jump down to the left and you will land on a conveyer belt. Head to the right and be careful to avoid the giant presses that come crashing down or you will get squashed. There’s also some hot carrot juice that comes out that will burn you if you get hit. Once you get past these things, jump up on top of the steel girder and you will see a bunny ears hat. Run over it to pick it up. These are drone ears just like all the other people in here are wearing. Go ahead and put them on now and then go through the Exit.
You’ll arrive back in the room that had the security robot and the trap door. Now, while you’re wearing the bunny drone ears, go back to the big doorway. This time, you’re authorized and you can get inside.
Dr. Hare
You’ll be standing next to Dr. Hare. He thinks you’re one of his drones and tells you to start the launch sequence for his big spaceship. Jump up the spaceship. There will be a platform on the right with a big computer on it and a guy wearing the drone ears next to it. Click on him and say, “Look, a giant bunny!” You’ll zoom in on his ears. Press the power button to turn them off. Then click on the computer and enter the password, which isfuzzybunny. It will then ask you to enter a command. The command is on a sticky note on the computer and it islaunch rabbot. Make sure you spell it just like that. It’s rabbot and not rabbit. Rabbot is the name of the robot spaceship.
The robot spaceship will launch and then you will be able to control it with the joystick on the computer. Now you want to try and crash the spaceship by moving it into the path of the oncoming asteroids. Each time you hit one, Dr. Hare will yell at you. After you hit four asteroids, the robot spaceship will explode and Dr. Hare will fly off into space. You did it! Now follow the guy up the rope and out of the factory.
You’ll be back in the main area standing in front of the gas station, but now 24 Carrot Island is bright and colorful again. Go all the way to the left and talk to the mayor. He will thank you and give you a medallion for saving the town. Congratulations!
______________________________________________________________________________________________
SUPER POWER ISLAND
Getting Started
The first thing to do is go to Super Power island. When you arrive, just walk a bit to the right and go inside the Comic Shop. You’ll see a geeky looking guy on the right-hand side of the shop with pimples and wearing big black-rim glasses. Talk to him and ask him if he has anything other than comic books. He will give you a book called The Superhero’s Handbook that he wrote. You can read the book in your inventory. It’s a pretty funny book.
Leave the comic shop and go to the next store on the right, the Masks and Capes shop. Go to the guy to the left holding the scissors. He will give you a Super Hero ID card which identifies you as a superhero and tracks the number of villains that you have defeated. On the other side of the shop is a row of mannequins that have different costumes on them. Click on them to pick your costume. You can mix and match pieces from all the different costumes.
Next, leave the Masks and Capes shop and walk to the left. Cross through the water and you will come to an island with a prison that has a green meteorite that smashed into it. Talk to the guard with the gray hair and moustache. He is the prison warden. Talk to him about the escaped prisoners and he will give you an item called the, Super Villain Files. You can look through these files to see all the villains that you need to capture. Then talk to the woman wearing the lab coat and she will give you anti-power handcuffs, which are designed to let you capture super-villains. Once you have those items, it’s time to capture some super-villains! Go all the way to the right until you get to a sign that says Downtown. Click on that sign to go to the next room. It’s a short one. Walk to the right and then click on the next sign and you will arrive at Main Street. Talk to the police officers standing outside of the bank and they will tell you that Copy Cat, one of the super-villains who escaped the prison, is inside.
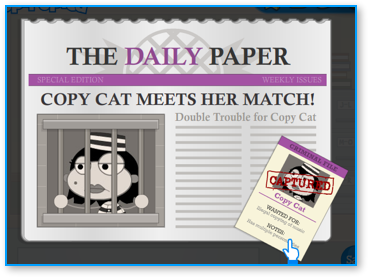
Capturing Copy Cat
Enter the bank and walk to the left, where Copy Cat is standing. She will make several copies of herself and each one of those copies will hide in a different spot in the bank. She will also drop a smoke grenade on the ground and you will only have about a minute until there’s too much smoke in the bank for you to breathe. You have to capture all the copies of her before there’s too much smoke in the bank. Just walk over each copy of her to make it go poof and disappear. You’ll have to jump up a little to capture all of the copies. Use the elevator on the far right to get to the upper level.
When you get to the last copy cat, you will capture her and you’ll see a newspaper announcing her capture. You’ll be sent back to the prison and you’ll see her back behind bars. If you look at your Super Hero ID card in your inventory, you’ll see that you have one sticker in your villains defeated section. Now it’s time to catch some more!
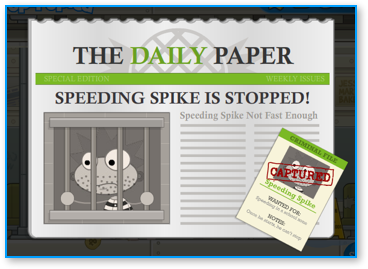
Capturing Speeding Spike
Go back to Main Street and then go all the way to the right until you get to a Subway sign. Click on the steps to go down into the Subway Station. Talk to the police officers in the Subway Station and they will tell you they need help catching Speeding Spike. Go inside the train and then walk all the way to the right, where you’ll see Speeding Spike holding a bag of money. Catching him is easy. Just keep jumping over him when he tries to hit you with the bag of money. He’ll keep moving to the left to different train cars and if you can keep getting him to miss you he’ll get so tired out that he sits down on the floor. When he does that, walk up to him to put on the handcuffs and send him back to prison.
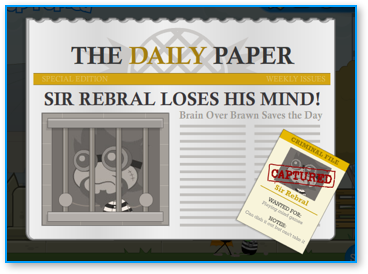
Capturing Sir Rebral
Go back all the way to the right and this time go past the Subway Station stairs to get to the City Park. When you arrive, you’ll see that Sir Rebral is standing on top of a broken statue. When you go near him, you find out that he’s controlling rocks that fly up from the ground and follow you until they hit you. You need to position yourself so that you can jump to avoid them (they’ll still follow you) and then get yourself on the other side of Sir Rebral so that the rocks hit him instead. This will make him angry and then parts of the ground will start popping up.
The next step is to find the light gray rock that you can push. Move this rock on top of one of the places where the ground pops up so that the rock will fly up into the air and hit Sir Rebral. This will knock him down and stun him so that you can walk up to him and capture him with the handcuffs. You’ll go back to the prison where you can see him safely behind bars.
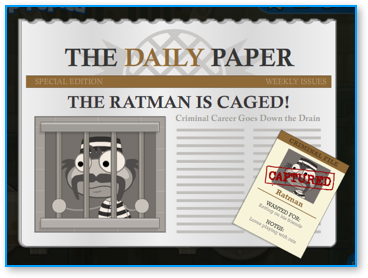
Capturing Ratman
Return to the City Park and go inside the public washroom. There’s a hole next to one of the toilets. Go down the hole to get into the sewers. Walk over to the left and you will see a brown wheel. Click on it while standing on the platform underneath and the water will drain so that you move downwards. When it stops, go to the right until you get to some platforms. Jump up those and you will find another wheel. Turn it to make the water rise again partway. Swim to the left until you find another wheel and the water will rise again. Go to the left one more time and you’ll find a door that you can enter. Go through the door and Ratman will be inside. Jump up to the top right corner of the Sewer Room while avoiding the rats, and you will see a red wheel. Click on it to turn it, and it will sprinkle water over the Ratman and his flies. Ratman will be knocked out and the flies that are buzzing around him will start following you. If they touch you, you will get stung so you want to try to get to Ratman very quickly. Click on him to handcuff him and send him back to prison.
Capturing Crusher
Head back to City Park and go all the way to the right. You’ll see a sign for the Junkyard. Follow that sign to go inside. When you arrive, you’ll see Crusher standing on top of a pile of junk. Talk to the police there and they’ll tell you they’re unable to capture him. Good thing you’re a Super Hero here to save the day again.
To defeat Crusher, you’re going to sneak to sneak past him twice. Head all the way to the right and get up on top of the oil barrels then leap onto the platform where he is standing and run right past him. You’ll get to a crane. Jump up the crane until you get to the cab at the top and click on it. Then drag the magnet control lever. The crane will release a heavy refrigirator which will fall on Crusher. But he lifts it off and throws it at you, knocking you back down. And now he’s really mad.
You have to sneak past Crusher one more time, but now he is hurling empty oil barrels at you and they will knock you down if you get hit. Try to get back to the crane one more time without getting hit by the oil barrels as you go. When you get all the way back to the cab of the crane, click and drag the magnet lever again to turn it back on. The magnet will pick up Crusher and then crush him flat! You can then safely go down to where he is and put the handcuffs back on him. Crusher is going back to jail!
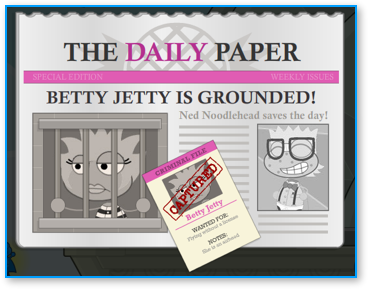
Capture Betty Jetty
Go back to the main area and walk by the telephone booth, which will be ringing. Answer it and you’ll be given a new superpower. The ability to fly! Click on the flght icon in the lower-left corner to fly in the air.
Go to the Downtown area and fly up to the very top of the Skyscraper and then go up. You’ll see Betty Jetty standing on top of an antenna. She will taunt you and fly away. Make sure your flight power is activated and chase after her. She will throw green energy balls at you. Each time you dodge them, you’ll get a little closer to her and eventually you will be close enough to capture her. You can easily avoid the green energy balls she throws by moving off screen each time they come near you.
After you catch her, she will taunt you again, and Ned Noodlehead will appear and knock her over. Then you can put the handcuffs on her and she is captured and put back in prison.
Claim Your Reward
When you talk to the warden, he will say that he gave the island medallion to Ned Noodlehead for capturing Betty Jetty. You can get Ned to give it to you by first going to the hot dog vendor in City Park. Talk to the vendor and he will give you a hot dog. Then go back to the comic book shop and talk to Ned Noodlehead. He will offer to trade you the medallion for a hot dog. Do the trade and you will finish this island. Hooray!
Fun Things and Secrets
Old Superhero
There’s an old superhero on the top of the Daily Paper building. You can get up to him after you get the flying power from the phone booth. When you click on him, he will tell you, “Remember with great power comes great responsibility.”
______________________________________________________________________________________________
SPY LAND
Text Walkthrough
Arrive at Spy Island by balloon and then run to the right and enter the Headquarters building. Jump up to the top until you see a guy wearing a white jacket at bow-tie. This is Director D, the head of your secret agent organization. He’ll give you a Decoder Kit.
Leave the Headquarters and run down the street to the right. Enter the Spyglass Eyewear building. Walk to the left and talk to the guy standing next to the eye chart. Ask him to give you an eye exam. When you take the exam, choose the exact opposite symbol as the one he points to. By choosing the opposites, you’re giving him the secret code letting him know you’re an agent. He’ll leave and tell you to meet him upstairs.
Go outside the exit and then jump up on the outside of the building. There is a small door in the upper left. Go inside it. Talk to the eye exam guy here and he’ll reveal that he’s the scientist for secret operations. He’ll give you a special item that he has just developed: the chameleon suit. Go ahead and put this suit on and you’ll blend into the background whenever you are standing still. Leave this room and run left through Main Street. Go to the Docks.
When you arrive at the docks, start making your way up to the top onto the roof. Avoid the guards by standing still. When you’re not moving, your chameleon suit will make you invisible and the guards cannot see you. Run across the roof until you reach a small doorway. Then go inside.
Head down through the floors in this room the same way. You can avoid the dogs whenever you stand still. When you get to the bottom-left corner of the room, you can drop down an opening into a smaller room. One of your fellow secret agents is lying on the floor, tied up with rope. Click on him to set him free. He’ll give you a laser pen, which is an ordinary looking pen that can cut through certain types of metal. He’ll also give you a satellite clue card before he runs off. Next, jump out through the hole in the roof and this time run to the right along the floor until you reach the exit. Then go through and you’ll be back out on the docks. Run back to the right to Main Street.
Run right through Main Street to Balding Avenue. Then keep going until you get to the B.A.D. Bistro. If you’re still wearing your chameleon suit, it will automatically be removed when you enter. Run through the restaurant past the B.A.D. operatives at the table and go into the kitchen. Talk to the chef and apply for the job.
When you apply, you’ll take a test where you have to remember the order of ingredients that the chef points to with his wooden spoon. After you pass the test, you’ll be hired and get a chef hat. Put it on. Then go back out to the table and talk to the B.A.D. operatives. One of them will ask you fill up his glass. He’ll give you a wine glass that has his fingerprint on it. Run back into the kitchen and then jump up above the stove into an opening in the ceiling. Leap across the lights hanging down to cross back over the restaurant area without the B.A.D. operatives seeing you leave with the glass. When you reach the end, drop back down and then leave the restaurant.
Once outside, run right until you see a guy in the bushes wearing camouflage. Talk to him and he’ll give you a folder called File X. Open up your backpack and examine the file. Slide the paper back into the file so that only one row of letters can be seen. You can now read a secret message from top to bottom that says:
Don’t Trust Director D
Uh-oh! Could Director D be a double agent? We’ll soon find out. Continue running right to Toupee Terrace. You’ll come to a house with an alarm system on all the windows. Keep jumping up the windows and side ledges while avoiding the lights that turn on. Go all the way up ad across the house until you get to the roof. At th e very top there is a grate. Click on it and use the laser pen to cut the metal bars, then go inside.
Once inside the attic, walk to the left and you’ll find another fellow agent tied up. Click on him to release him. He’ll give you a special item: a grappling bow-tie, one of the coolest items in Poptropica. Using this tie, you can swing from building to building with ease. Kind of like Spiderman. He’ll also give you another piece of the Satellite Clues. Go back outside the attic and jump down. Then head left back to Balding Avenue.
Put on your grappling bow-tie and stand on the ledge next to the guy in camo who gave you the file. Then click on the bow-tie icon in the lower-left corner of your screen. Aim straight up. The bow-tie should catch far above and carry you up to a sign that points to the rooftop. Click it to head up there.
Jump up to the top of the roof and stand on the very edge over on the left. Click on the bow-tie again and aim at about a 30 degree angle to the left. The bow-tie should attach to the radio tower with red lights on it. You’ll jump all the way to it. It can be tricky to land on it cleanly, so if you miss, just keep using your bow-tie to get yourself to the very top of the radio tower. Once there, aim your bow-tie out to the right at about a 20 degree angle and you should end up on another glass rooftop. There’s a metal air vent up here. Click on it to go inside.
Now you’re in a big greenhouse. Run to the far right, where you’ll see a cherry bomb tree with a large cherry bomb growing in it. Click on the cherry bomb to make it drop. The fuse starts, so quickly push it to the left onto the top of the plant nearby. This is a spring plant and it will shoot the cherry up onto the platform above. Use your bow-tie to jump up there as well. Push the cherry bomb again to the left until it drops down. Then push it on the next plant and follow it up. Now push it in front of the door to a cage where another fellow agent is being held captive. Wait for the bomb to explode and destroy the door then click on the agent inside. She’ll give you some ultra vision goggles and the remaining piece of the satellite clues. Then she takes off.
Put on the ultra vision goggles and then drop down to the left and exit the greenhouse. Jump down and off to the right until you land on the ground in Balding Avenue. Head right again to Toupee Terrace and run past the house with the security alarms. Go all the way to the right through a hole in a fence with a sign saying that it’s the B.A.D. control center.
This area has a series of lasers that you need to avoid by timing your moves across. First go all the way to the right and then go up the slanted side of the building. You’ll get to a moving platform, jump on it and then go to the left onto another platform that goes from left to right. This part is kind of tricky. Jump again to another up/down platform on the left and then up to the platform above. There’s a door there with a fingerprint scanner. Since you have the wine glass with the fingerprint on it, you’ll use that to sneak inside.
Jump up while avoiding the lasers until you get to a platform with computers. You’ll get trapped inside a cage and then Director D will come out and save you. He’ll ask you to get the teleporter working. Use the satellite clues and place each clue on top of each other. They’ll spell out a code: LASER HAIR REMOVAL. Enter those three words once by one into the computer. The teleporter will turn on and then Director D will step inside. Follow him through the teleporter.
Director D will reveal two things: one, he’s wearing a toupee and two, he’s behind the B.A.D. organization. He’s a double-agent after all! He’s got control of his satellite back and plans to vaporize the hair off everyone in Poptropica. He’ll step inside his rocket and then some mini-bot robots will appear out of the wall.
Now it’s time to test your bow-tie grappling hook skills to the max! Your goal is to lure the mini-bots into the gold power speheres located around the room. The first two are really easy because they’re on the ground. The next two are tough, because they’re up high. The goal is to place yourself on the opposite side of the sphere from the mini-bot. It will go on a straight line to get you but electrocute itself when it hits the sphere. When all the mini-bots are destroyed, Director D comes after you in his rocket satellite thing. Using the same technique, try to get him to smash his ship into the ceiling several times while avoiding him. Once he smashes up his ship, he’ll surrender and be put in prison. You’ve finished the island and won the medallion. Congratulations!
Spy Island Glitch
Note: some people are saying that this glitch with Director D does not happen for them and that he only appears in the cage. It might just be a random thing.
Wow, you read this far? Good for you. You get a nice reward. Did you know there’s a story line glitch in Spy Island? If you finish the island and then return to Headquarters you can meet and talk with all the agents that you freed, as well as the secretary of the agency (the guy who gives you the island medallion). But if you go all the way to the top of the HQ, guess who’s still standing there? That’s right, Director D! The Poptropica Creators forgot to remove him from HQ after he reveals he’s actually a double agent and the mastermind behind the B.A.D. plot.
_________________________________________________________________________
NABOOTI ISLAND
The Museum
Your very first stop is the Nabooti African Museum, which is just to your left when you arrive on Nabooti Island. Go inside the museum, run to the left and drop down to the first floor. Then walk over to the right until you get to the Nabooti Monument. Spek with the woman standing next to it and she will tell you the tale of the missing jewels. When she asks you to help find the jewels, accept her offer and she will give you a map of Africa.
Now head outside the museum and walk to the far left. You’ll see a plane. Click on the seat (the cursor should say ‘Fly!’) A map of Africa will appear and the plane will follow your mouse cursor. Fly to the right until you see a dot labeled, Mountains of the Moon. Click on this dot and your plane will land there.
Mountains of the Moon
The first part of this area can be incredibly frustrating. The basic idea is to get all the way to the top while avoiding the boulders that come crashing down on you. The goats will also head-butt you if you get too close to them. To start, run to the left and jump over the goats in your path. When you get to the far left, stop and let the goat come and butt you. He will send you flying in the air and you’ll land safely on the ledge above.
Jump onto the trees to the right of the ledge and then jump up when you see a woman above you. Speak with her and she’ll tell you she’s having trouble getting one of the cactus figs on the cliff. Jump up to the left and collect the Opuntia Fruit (a.k.a. cactus fig). Then run to the right and jump over the waterfall, and head back up to the left, avoiding the goats and boulders if possible. Keep jumping up on the icy ledges until you get to the upper-right corner. You’ll see an old man above you but you can’t jump directly to him. Instead, do a running jump to the left to get to the platform and then jump back across to stand next to the old man in front of the cave.
The old man will challenge you to a game of Mancala. Once you begin the game, you’ll learn the rules if you don’t already know them. When you win, you can enter the cave behind him.
Drop down the left side to get to the bottom, where you’ll find an old cell phone. There are some cool cell phone tricks you can use to get special costumes, but for now, just keep going. Jump up the platforms to return to the starting location and then jump onto the narrow platforms to the right. You need to keep moving to avoid the falling icicles and you might fall a few times before you get across. If you do, just return up the platforms on the left and try again. Once you reach the end on the far right, you’ll find one of the Lost Jewels of Nabooti. This is the red jewel. Now return to the cave entrance and go outside. Then jump down to the right and make your way back to the plane.
I guess the cell phone reception in this cave wasn't strong enough to save this guy.
Blue Nile Falls
Fly the plane to Blue Nile Falls on your map. When you arrive, jump up onto the platforms and go up to the top where you will see a purple flower called an Egyptian Blue Lily. Jump on top of it to put it in your inventory. Now jump down and to the right across the waterfall to get to another set of platforms and climb up those.
You’ll arrive on a platform where there’s a woman standing with a chicken, a fox, a bag of feed and a basket attached to a rope and pulley. Talk to her and you’ll discover she needs help getting all three items across. Offer to help her. This is a classic puzzle where only one of the three items can be moved at a time, and certain pairs of items (like the fox and the chicken) can’t be left together unattended. Here’s the correct order of how to move everything across.
- Bring the chicken to the left side and go back with an empty basket.
- Bring the feed to the left side and go back with the chicken.
- Bring the fox to the left side and go back with an empty basket.
- Bring the chicken to the left side.
You need to move the fox, chicken and feed over in the correct order.
Congratulations! You did it. Your reward for helping the woman is that she tells you about a hidden cave behind a bush on the right side of the waterfall. Jump down and to the right. If you set it up correctly, you’ll land right in front of the cave. Click on it to go inside.
There are several narrow platforms you need to jump across inside the cave. If you fall down, just jump back up on the left side and try again. Watch out for the stalactites that fall from the ceiling. When you get to the end, you’ll find the purple jewel of Nabooti. Once you have it, head back outside and return to your plane.
Return to Nabooti
Now you must make a quick return trip to Nabooti to make a trade with one of the merchants. Fly there and then speak to the woman wearing the orange clothing. She will offer to trade your Egyptian Blue Lily for a Desert Turban. Say yes and once the trade is complete, head back to your plane.
Giza
The next stop is Giza at the mouth of the Nile River near the top of the map. As soon as you arrive, open up your backpack and put the Desert Turban on. This will disguise you to look just like one of the tomb raiders digging at the pyramid. Walk over to the first one and he will give you a shovel. Pay close attention to the shovel handle. It has the name Vince Graves and a phone number (555-6789) carved into it. Now pull out your cell phone and dial that number. It will cause the phone to ring in the tent to the right and the boss will go inside the tent to answer it. As soon as he does, the workers all run away.
Go to the outside of the tent and click on the backpack sitting on the ground. Inside there is a Moon Stone. Take it and then jump up on top of the Sphinx’s head. Then use the moon stone. It will cause a moonbeam to appear and magically open the tomb door at the bottom of the Sphinx. Jump down and go inside.
Wheeee! Jumping off the top of the Sphinx in Giza.
You’re now inside the tomb and you’ll encounter a series of tricky puzzles that you need to solve. The first puzzle is some rotating blocks. Walk all the way to the right and click on the panel you see. Now you need to get all four pieces to be horizontal. Clicking on one causes the other three to rotate. The correct order to click is (looking from left to right) the first piece, then the third piece, and finally the fourth piece. When all four pieces are horizontal, the platforms to the right will form a bridge that you can cross. Keep moving to the right and then jump up. You’ll soon arrive at the second puzzle.
In the second puzzle, you need to push the blocks on top of the platform down and arrange them underneath to match the layout on the wall. It’s a little tougher than it first seems because you need to do things in a certain order. If we number the blocks from 1 to 4 going from left to right, here is what to do.
- Push block 4 down on the right side of the platform and then push it to the left so that it’s a little bit past the left edge of the platform above.
- Push blocks 1 and 2 down on the left side of the platform and then push them to the right so that they’re past the right edge of the platform above.
- Jump on top of blocks 1 and 2 and stand in the middle and then click down to get inbetween them. Then push block 1 back to the left until it’s touching block 4.
- Go back up on the platform and push the remaining block 3 down to the right.
- Jump down and get on the right side of block 2, which is now the last block on the right. Push it towards the middle.
- Jump over to the left and push the other blocks towards the middle.
All of the blocks should now line up in the correct order in the middle. Once you get them exactly right, a hidden door up above will open up. If you mess up, you can pull the reset handle and start over. Once the door opens, jump to the right of the blocks and push them all the way to the left wall. Then jump up on the blocks and jump up to the platform that just opened up. Run through the hall and jump down and go to the left, past the pottery on the ground. You’ll arrive at the next puzzle.
Now you must jump up another series of platforms. Each one has different hieroglyphics (pictures) on it and you must jump on them in the correct order or they will all come crashing down and you’ll have to start at the beginning. The correct order is as follows:
- Jump on the picture of the person.
- Jump on the picture of the boat on water.
- Jump on the picture of the bird with the staff.
- Jump on the picture of the eye over the long shape.
Now you can jump onto the row of bricks above your head. Walk a little to the left and climb the rope. When you land on the rope, the bricks below you will crash to the ground. When you reach the top of the rope, you will arrive at the final (and hardest) puzzle in the tomb.
In the final puzzle room, there are four columns and each one has a switch on it. Clicking the switch causes sand to fall and start filling up the room. You need to click on the switches in the correct order and you need to move very quickly. The correct order is the fourth column, followed by the second column, then the third column, and then finally the first column. When you get all four switches, the sand will stop flowing and the sarcophagus in the the middle of the room will open to reveal blue Nabooti jewel. Walk over to claim it and then run out of the Sphinx and return to your plane.
Kaya Forests
The next stop is the Kaya Forests. Go to the right of the plane once you land and then jump onto the roof of the second hut. Then jump up into the trees and you will find a gold nugget in one of the treetops. Jump down to the ground and look for a giant tortoise shell. Go into your backpack and use the Opuntia Fruit. You’ll walk over to the left and place it on the ground. The tortoise will wake up and walk over to the fruit to eat it. Now go over to the small hole where the tortoise was sitting and use the shovel in your backpack. You’ll uncover an Ebony Elephantfigure and two strange ghosts will appear. Click on the one on the left and he’ll tell you to return a Fingo to him for a reward. Head back to the plane.
Second Return Trip to Nabooti
Fly back to Nabooti and speak to the woman in the blue outfit. Trade the elephant figurine for a Fingo. Now talk to the man and trade your gold nugget for a digital camera. Head back to the plane.
Return to Kaya Forests
Fly back to the Kaya Forests and speak to the ghost again. Tell him you have found the Fingo and he will give you the green Nabooti jewel as a reward. Go back to the plane.
Safari
The next stop is the safari. Walk to the right and you’ll meet Big Zeke, who runs the safari expedition. He’ll tell you that he needs to get seven good pictures of different animals. Tell him you’ll help and he’ll take you to the picture spot. This starts an easy mini-game where you need to take pictures of animals that are hiding. Here’s how to find them all. Move the camera with your mouse and click when you want to take the picture. Make sure the animal is completely out of its hiding spot when you take the picture.
- There is a bird in the top left corner on a tree-top.
- You’ll find a giraffe in the middle, next to a tree.
- There is a zebra to the left of the giraffe.
- The lion is right next to the zebra, hiding in the bushes.
- There is a crocodile in the stream.
- You’ll spot an elephant on the right side.
- A gazelle will pop up in the bottom-right corner.
Getting pictures of all the animals at the safari.
Press the close button in the upper-right when you have all seven good pictures and then Big Zeke will give you an old mining helmet as a gift for helping him take the pictures. Head back to your plane.
Diamond Mines
Fly South until you get to the bottom of Africa and click on the dot for the Diamond Mines. As soon as you arrive, open your backpack and put on the Miner’s Hard Hat. The run all the way to the right until you pass an electric fence and arrive at a control box with a dial and wires. Click on the switch between the red and green lights to turn off the electric fence. It will only stay off for a short time and a timer will appear in the lower left corner to show you how much time is left before the electric fence turns back on. Now move quickly to the left and run up to the top of the mound of dirt. Jump up onto the metal structure and the run up it until you fall through the gap. Keep running to the right until you reach a barrel of explosives below a hole in the fence wire. Jump on the barrel and then jump up through the fence. Your cursor should say ENTER here, so click to move to the next spot.
Run to the left until you get to a series of ramps. There are large red metal explosives carts coming down the ramps. Keep jumping up the ramps while avoiding the carts. Then go down into the chute where the carts are coming up from.
When you arrive in the next spot, you’ll see a switch with a green light and sparks shooting out of it. Click on the switch to turn it off. Then jump to the left side of the explosives barrel on your left and push it to the right until it stops against a rock. Some of the gunpowder leaks out of it as you push it along. Go back to the switch and click on it to turn it on. The sparks will light the gunpowder trail and then make the barrel and the rock explode. Turn the switch off and repeat this one more time, by pushing a second explosives barrel all the way to the far right where you’ll come up to a wall of rocks. Turn the switch on and they’ll all explode, revealing a passageway to the right.
Push the mine cart a little bit to the right and you’ll jump inside. Now you just need to avoid obstacles by ducking at the top and jumping over the stalagmites in the ground as you pass them. Time your jumps so that you jump as soon as you see the signs telling you to do so and duck down well before the cart nears the high points in the track. You’ll need to duck four times and jump three times. When you reach the end, you’ll arrive in the next room.
Jump when the signs tell you to.
Run all the way to the right and climb up onto the wall. Then jump back to the left onto the platform and then jump up again onto the second platform. There is a large black rock with diamonds still inside it. Click on the rock and you’ll play an easy mini-game where you need to find the final white Nabooti crystal with a magnifying glass. The Nabooti crystal is the one with a tiny inscription on it. It’s over on the left side and very easy to locate. Once you have it, climb up the rope and head back to your plane.
Final Return to Nabooti
Now that you have all the crystals, fly back to Nabooti and go inside the museum. Walk down to the bottom floor and speak with the woman next to the statue again. Now you need to place the crystals inside the statue in the correct order. From the bottom, the order is: yellow, orange, blue, white, red, green, purple. Once all the crystals are in place, the statue will turn into a spaceship and zoom into outer space. Congratulations, you’ve completed the Nabooti Island mission. Claim your medal as a reward!
______________________________________________________________________________________________
BIG NATE ISLAND
Text Walkthrough
- Once you arrive at Big Nate Island, head to the right and go inside the Comic Book store (called Klassic Komix) and talk with the guy to the right in the tan shirt and blue jeans. He’ll tell you he needs help finding all the missing pieces of a comic.
- Go outside and walk to the left. Go into the Pop-In Shoppe. You’ll find one of the comic strip pieces on the couch on the top floor of the shop.
- Head outside and run to the right until you get to the photo store. Go inside and you’ll find another comic piece on top of one of the lights to the right.
- Head back outside and go a few steps to the right. Climb up the telephone pole to the top and you’ll find another piece of the comic.
- Go to the right until you arrive at the school. It looks pretty broken down and there’s a lot of unfinished construction going on. Go inside the school and walk up the stairs to the right. You’ll find another piece of the comic on one of the broken loudspeakers in the wall.
- Now go into the Science Lab and walk to the far left of the room. You’ll see a model of the solar system suspended from the ceiling. There’s another piece of the comic up there. Grab it and leave the Science Lab.
- Go outside the school and then jump up the windowsills. You’ll see some scaffolding to the right and one of the comic pieces is sitting on top of a bile of bricks. Grab it and jump back down.
- Next, head right to the playground. Jump all the way up to the top of the playground structure and you’ll find a comic piece on the left side. It’s floating around a little bit in the air above the two green and yellow flags. Jump up and grab it. Then jump down off the playground structure.
- Go right and you’ll arrive in Puffin Point. There’s a lighthouse here. Jump all the way to the top of it and you’ll see another comic piece on the top of the pointed roof. While you’re up here, take a peek through the telescope next to the guy who is painting. Move the telescope to the right until you see a piece of papertrapped between some big rocks.
- Now jump down on the left side of the lighthouse. As you fall, you’ll see a black and white photograph floating around. Try to grab it. If you miss, climb back up the lighthouse and try again until you get it.
- Now you have all the comic pieces. Click on the comic book item in your backpack and then re-arrange the pieces so that they all fit in the right order. You’ll see some writing on the edges, and that writing should end up in the middle. Once you’re done, you’ll see that the writing gives out a locker combination, which is: NINE THREE ZERO FIVE (9305).
- Head back to the left and return to the Comic Shop. Go inside and click on the guy. He’ll be very happy that you found it and will give you some chewing gum as a gift.
- Leave the Comic shop and go inside the Photo shop again. Talk to the guy on the left and offer to trade the old photograph for his Scuba Gear. Once you have it, leave the shop and head to the right.
- Go back to the school and go inside. Go into the Science Lab again. This time, click on the burner on top of the desk next to the test tubes. Turn the dial on the burner to 3. Now fill half the beaker with the blue liquid and then half with the yellow liquid. Once the beaker fills up, you’ll get a stink bomb!
- Walk outside the lab and go to the left where you’ll see a row of lockers. Click on the one with all the stuff sticking out of it and enter the locker combination from the writing on the comic: 9305. When you open the lock, the locker explodes from all the stuff packed inside and you get knocked down. Walk back over to the locker and pick up the papers that are on the floor. It turns out they’re a school blueprint.
- Head outside of the science lab into the hallway below. You’ll see a sign that says, No Gum Chewing. Hey, we don’t play by the rules! Open your backpack and use the gum that the comic store guy gave to you. As soon as you blow a bubble, a woman will come out and send you into detention.
- Use the stinkbomb in your backpack. The detention lady will leave the room because of the bad smell. When she’s gone, go over to the green filing cabinet on the right and click on it to reveal a secret ladder leading down. Click on the ladder to go inside.
- Climb down the ladder. It’s pretty dark, but there’s a power switch at the bottom of the ladder. Click on it to turn the lights on. Walk to the right and you’ll see a bronze thing hanging on a hook above the workbench. This is the bell clapper for the schoolbell. Grab it and then head back up the ladder.
- Go outside the school and run all the way to the lighthouse. Walk out onto the dock and put on your Scuba gear. Then jump into the water and click when your cursor says Dive.
- You’ll be underwater and you have only a little bit of oxygen so you need to move really fast. Just swim all the way to the right and then go straight down. Pick up the lobster trap on the ocean floor and let your oxygen run out. You’ll re-appear at the start and then you just need to swim back up to the dock. When you’re there, give the trap to the sailor at the dock. He’ll give you the lobster that was inside and the keys to his jet ski.
- Climb back up the lighthouse and use the lobster on the light. It will act as a wrench and turn the light to face the school. This will scare the seagull who is there away. If you haven’t looked through the telescope next to the guy who is painting up here (see above) then look through it now and move it until you see the paper on the rocks.
- Jump back down and get on the Jet Ski. Big Nate will jump on the other one and challenge you to a race. You need to beat him to the island. The best way to do this is to move as far to the right as possible so that you stay ahead of him and avoid the eggs that the seagull drops. Every few seconds, an obstacle such as a buoy will appear in the water and you’ll need to jump over it to avoid getting knocked down. Since you’re all the way on the right you won’t see the obstacles in time. Just jump up every few seconds and try to get the timing right. New objects in the water appear about every three seconds.
- Once you beat Nate to the island, jump up on top of the rock and push the two seals over to the left side so that the rock tips up. Jump off and run down below the rock to the piece of paper and grab it. It’s a map to the time capsule!
- Now run to the school and jump all the way to the bell tower at the top. Open your backpack and use the bell clapper to replace it. This will ring the bell, which sends the girls in the playground back inside.
- Now run back to the left to the playground and go inside the clubhouse at the top with the “Kids Only” sign. Once you’re inside, click on the piece of paper that says “Go to Jail.” This is a simple hangman game and Big Nate will challenge you to a game. Once you solve the word, he’ll give you some old peanut butter crackers as a prize.
- Leave the clubhouse and jump straight down. Go to the spot in the middle of the ground where the girls were standing. If you forget where that way, it’s the empty space between the two wooden boards in the middle of the structure.
- Open your backpack again and use the peanut butter crackers. This will summon the dog and he will dig right where you dropped the cracker. When he digs his hole, the time capsule appears!
- Click on the time capsule and you’ll zoom on it. Click and drag it to lift it out of the hole, and then click on the yellow latch to open it.
- You’ll find a pearl inside the time capsule, which is worth enough money to save the school. A newspaper will appear with the story. Click on the close button and the detention lady arrives. She will give you the island medallion. Congratulations!

The first piece of the comic is inside the Pop-In Shoppe.

Scroll the telescope to find the paper under the rock.


The dog digs up the time capsule.
That wraps it up for Big Nate Island. You’ll get 100 credits for finishing it along with your island medal.
______________________________________________________________________________________________
ASTRO KNIGHT ISLAND
Arrival in Arturus
You’ll arrive by ballon in Arturus. When you land, the first building you will see is the House of Mordred, although it’s now called Mordred’s Museum. It was once occupied by a powerful and mysterious sorcerer named Mordred and it contains a number of things that he used while he lived here. Next to the house is a large fountain with a spaceship statue in it and the statue and fountain are dedicated to Mordred for bringing technology to the kingdom. The remaining two buildings are the planetarium and the Crop Circle Inn. This final building is a multiplayer room where you can battle other players and chat.
What to Do in Main Street
Proceed immediately to the fountain. In the water near the base of the spaceship you will see something sparking and shiny. Jump up to get it and you will discover that it is a coin. It will go into your backpack. Now go back to the first building, the House of Mordred. Talk to the man you see when you enter and get the pamphlet. Then use the coin in your backpack and he will tell you that you are free to look around. Next, click on one of the books. The guy will ask you not to touch them, but will give you a library slip. This library slip is a clue to a hidden area. Pay attention to the underlined parts: McM.
The Library Book Slip
What to Do in Castle of Arturus
Next, go outside and run all the way to the right to the end of the area. Pass through the short road and go right again. You will arrive at the Castle of Arturus. Walk to the right and then go through the large double wooden door. Now go to the right and enter the small wooden door. You will be inside the castle library. There are two books to get. To pick them up, just walk over them. One is a green book on the far left side of the room in the Fiction section. It is called, Mystical Weapons of Arturus. The second book is The Life of Mordred – A Cautionary Tale. It is down the stairs in the non-fiction section on a book stand. After you get the second book, look at the nameplates on the shelves. One is labeled McM, just like the underlined section of the library book slip you got earlier. Click on the brick behind the nameplate and a secret staircase in the floor will open up.
The secret staircase in the Castle Library
Go down the stairs and you will arrive in an underground room. Walk over the moldy cheese on a plate right near the entrance. Then walk a little farther to the right and click on the wooden handle on the wall. This will open up a small grate near the ground over to the right, but not the one between you and the robot in the cell. Click on the robot and he will say some long binary numbers (all 1′s and 0′s). This can be translated and the correct way to translate it is “bard”. Go back up the stairs.
When you return to the library, the librarian is there with two guards and is unhappy with you for snooping around. Run out the library and return to the main part of the castle. Go to the left and then enter the door by the staircase. There is a robot mouse on the ground and a very unhappy girl here. Go to your backpack and use the moldy cheese. The robot mouse will go for the cheese and then you will capture him. Now go to the right and jump up on the chest next to the bed. There is a letter on it. It is a secret message that says, We must change our password! I feel my parents will find out what we are doing and put an end to it!
Trapping the robot mouse with moldy cheese
Now leave the room, go up the stairs and enter the door at the very top. This is where you’ll find the King and Queen, who are distraught over the kidnapping of their daughter. Ask the Queen if she can think of anything else that might help you and she will give you the coordinates of the three knights who left in search of the princess. The coordinates are: X-73 Y-83, X-15 Y-15, and X-83 Y-20. Go back outside the castle and run to the right. Keep going right until you reach a new area, Ye Olde Rumour Mille
What to Do in Ye Olde Rumour Mille
Talk to the hooded guy near the entrance and he will give you a Bag of Manure (gross!). Then jump over the two hay bales and run up the hill to the door for Ye Olde Rumour Mille. Go inside. Now walk to the left and jump up on the hay bales. Then jump on the shelf and then up onto the gears and cogs. When you get near the top, jump to the right to land on a small platform in the middle. You will see a piece of rope hanging to the right. Jump onto this rope and this will lift the wooden rod so that it is no longer attached to the gears. Slide down the rope and you will land on a platform next to a very pale dark haired girl. Click on her. She will ask to trade secrets, and will take the secret message you found in the castle. In return, she will give you a piece of paper with three cosmic symbols on it. It is the new password for the Secret Order. Jump down off the platform and go outside.
To the right of the mill is the big wheel in the mud. On top of that wheel is a coil of rope. Jump up on the wheel to get the rope. Now walk over to the left and stand underneath the Ye Olde Rumour Mille sign. Jump up on top of the sign and then jump up on top of one of the windmill blades to get it to start spinning. Keep moving around and jumping on the blades to spin them around until the little glass bubble on the roof is completely open. When it is open, go inside it.
Inside the windmill you will find a broken hover craft. It needs something to power it. Fortunately, you have something. Open up your backpack and Use the bag of manure. The hover craft will fly out of the roof and land in the mud outside. Go back out of the ceiling to leave the windmill. Before you use the hover craft, though, there’s work to be done back at the castle.
What to Do in the Princess’s Tower
OK, head back to the castle and then stand in front of the large oak door. Jump up onto the windowsill and then jump onto the platform with a large bow and arrow on it. Then go to your backpack and select Use on the coild of rope. The rope will be attached to the arrow. Now point the arrow in about a 45 degree angle to the left and click to shoot the arrow and rope. If you aimed correctly, the arrow will stick into the door of a nearby tower. Now walk across the rope and enter the door in the tower.
Go to the left past the bed and you will see some brown paper sticking out of a chest with scrolls and parchment inside. The brown paper says,
The order believes the Great Inventor kept many of his secrets under his bed, but the order dare not come out of their hiding place to seek them. I will do my best to aid them in their search because I believe Mordred is alive! I’ve detected a veacon on a faraway planet, and I believe it may have come from him. I have sent a return signal, and…
Once you have the paper in your backpack, head back outside of the tower and then go left until you reach the fountain in the middle of the square.
What to Do in the Secret Entrance
Now that you’re back near the fountain, walk into the middle of it and click on the plaque on the wall that has the space symbols. Select the symbols in this order: Crescent Moon, Planet with Rings, 5-pointed star. Then click on the large Sun in the middle. A secret door will open and the water will drain out of the fountain. Go inside the entrance.
You’ve found a secret order. There are several people here wearing purple robes. Walk to the right and talk to the boy with buck teeth and pimples. He will give you a small key. Now get back on the rope and head out of this secret room.
What to Do in Mordred’s Secret Hideout
When you’re back standing next to the fountain, walk left to Mordred’s Museum and go inside. Go up onto the top floor and then click underneath the bed. You’ll find a missing page from Mordred’s Journal. It says:
I have found a nearby moon with much activity that I believe to be alien life! I have found that animal waster makes decent fuel, and there is just enough manure in Arturus to bring my flying craft to the moon. The coordinates are 56,52
Leave the museum and go back to the guy with the shovel who gave you the manure. Next to him are two bales of hay. Push them all the way to the right and then jump on top and stand between them. You should fall down to the ground. Then push the left bale back to the left side and you will reveal a secret locked trap door in the ground. Use the small key in your backpack to open it and go down.
Slide down the rope and then walk up to the mechanical owl. It will fly outside. Go back up the rope to follow the owl. Release the mechanical mouse from your backpack and the owl will fly down and eat it. CHOMP! Now the owl will be your friend and follow you around. If you click on the owl you can tell it where to fly.
Go back down the trap door and then walk left. Pick up the book that is sitting on the chair. This is Mordred’s Journal. Then walk all the way to the left and keep pushing against the wall. After a few seconds it will crumble into pieces. Go all the way to the left and you will see a small hole. Go through it to enter the cell where you found the robot. He will self-destruct and a fuel rod will fly to the left beyond the bars. You can’t reach it by yourself, but your new friend the owl can! Click on the owl and then click on the green rod and the owl will retrieve it for you. Click on the owl and then click on yourself and your owl will give you the rod.
What to Do with the Space Craft (Excalibur)
Go back through the hole and exit the secret hideout. Go to the right until you get to the windmill and you will see the hover craft that you found earlier. Jump onto the hovercraft and head to the right. You will find a spacecraft named Exaclibur. Click on the spacecraft and you will see a control panel. Drag the green fuel rod in the bottom left corner to the bottom right corner where you see a broken one that is dripping. Then enter the coordinates for the moon that you found earlier. They are 56-52. You enter the coordinates by spinning the two dials on the right. Once you’ve done that, press the red Launch button to take off!
What to Do on Pewter Moon
Your new spaceship will run out of fuel and crash land on the nearby moon. Go to the right and jump on the platform in the middle of the Astrozone building and then go inside. Talk to the guy on the left. Ask him how to get off this planet. He’ll tell you to leave your ship for scrap and then build a new one on the holopad.
Go outside and click on the Holopad machine to the left. There’s a big sign over it that says, Build Your Own Rocket Here. You can design your own rocket anyway you like. The most important thing is to balance your speed and shield. It will probably help to have a little more speed than shield, but you can probably survive the other way too. When you like your ship, click on the Done button and your rocket ship will be waiting for you on the launch pad nearby. Enter your new rocket ship to continue your adventure.
What to Do in Your Rocket
Click on launch to take off into space. There are three planets to visit and you can do them in whatever order you like. To fly the ship, just move your mouse cursor around. You can shoot your weapon by clicking. Pay attention to the coordinates in the bottom left. When you get into alien space, watch out because other ships may start to attack you.
Jungle Planet
The coordinates for Jungle Planet are 15,15. When you get near, an alien ship will start attacking you, so click on the planet as soon as you can. Once you arrive on land, exit your ship onto a platform and then drop all the way down onto the ground. Walk to the right and you will see a small platform with a weapon in a spotlight. Walk over to it to pick it up and put it into your backpack. It is a laser lance and it can release a destructive burst of energy when fully charged.
Next go to the left and jump on top of one of the flowers. They will catapult you into the air. Keep jumping until you reach your spaceship again. Up above you is a little green bug with yellow electrical charges shooting between his arms. The will zap you if you get too close. Watch for the swinging pendulum to your right and jump on it as it’s moving away from you (so that you don’t get zapped). Wait for the platform you’re on to go all the way to the right and then start swinging back. Then jump and you will land safely on the next platform. Keep doing this until you get ot a platform on the right and then jump off it. It might take a few tries to get this right. When you’re on the platform, go all the way to the right.
Next, you’ll find a knight in green armor. He is Sir Cador and he has failed in his rescue of the princess and he will tell you that you should try to get into the cage to rescue the princess. Click up the rope and then wait for the first egg to open. Then jump and if you timed it well, you will land on the egg when it closes again. Wait here until the next egg is open and then jump again. On this egg, jump immediately because it opens again very quickly. Jump onto the next egg and then jump onto the cage with a winged unicorn inside. Click on the cage to open it and then click on the Unicorn again. The mother phoenix will approach and you will play a game where you must defeat it with the laser lance while riding the flying unicorn.
This game can be really hard. You need to avoid the flying bugs, rocket missiles and lightning clouds. You can shoot the bugs but just get out of the way of the storm clouds and the red phoenix missiles that come at you. After a while, the mother phoenix appears. She will open her mouth and then you need to shoot a fully chargedshot from your laser lance and hit her in the head. To do a fully charged shot, click and hold your mouse button until the tip lights up green and then fire. It’s helpful to charge up your lance before she arrives each time so that you’re ready to shoot. After you shoot, get out of the way of her rocket missiles. Also, be careful because sometimes instead of appearing on the right side of the screen, she will sneak up behind you.
After you hit her three times in the head with a fully charged shot from your lance, she will destruct and you will return to the green knight. He will now accompany you on your mission. Once you are back in your ship, click Launch and then press the Teleport Home button.
Fire Planet
Go to the upper right to head towards the fire planet. It is located at the coordinates 83,20. Watch out because along the way you will encounter a black hole that you must navigate around. And just like with the Jungle Planet, the area around the Fire Planet has space aliens who will attack you. Once you land on the planet, exit your rocket ship.
You will be standing outside on a platform surrounded by hot lava. If you fall into you you will be sent back to the starting platform. Move to the right, jumping from platform to platform. Note: it is always easier to jump to the next platform when it is moving downwards. This is especially true for the last platform. When you get to the final platform, wait for it to get to the top of the volcano and then jump off to the left. You’ll land at the top of the volcano crater and can then go down inside.
Once you’re inside the volcano, you need to make your way through the caverns while avoiding the yellow steam that goes by. If you are touched by the steam, you get sent back all the way to the beginning and have to start over again. They key here is patience. There are little alcoves along the way where you can wait safely for the steam to pass. As soon as it disappears, make your move to the next safe spot. Once you get to a larger open area, the steam stops coming. But now there is a rolling rock creature that blocks you from passing. Time your jump to go over him just as he’s rolled up into a circle and you should be able to get by. Once you get past him, you’ll meet up with the Red Knight, named Sir Pellas. He will tell you that he failed and that a beast is holding the princess. He will give you an ice arrow to slay the beast.
When you enter the room to the left, move quickly to the first chain and jump up and climb it to the top. Then move from chain to chain until you reach the end. Drop down and run under the dropping spike ball from the dragon’s tail. Then click on the lever to temporarily shut down the robot dragon. Move quickly to the right so that you have a clear shot to the dragon’s open mouth. Click on your ice arrow and shoot it into the dragon’s mouth. If you hit him successfully, he will turn orange and red and start jumping up and down. This will cause stalactites to start falling from the ceiling, but the dragon will stop shooting fireballs at you and his spike tail will stop working. If you move quickly enough, you can go across the chains again (just watch out for the stalactites) and get under him before he reactivates. Then just flip the lever, move, and shoot him again. Tip: after you flip the lever, don’t wait for the spinning cursor to stop. Move to the right immediately so you will have enough time to position and shoot the ice arrow before the dragon moves his mouth. Shoot the dragon three times to defeat him.
Once you beat the mechanical dragon, the red knight will come into the room with you and join you on your mission. Return to your spaceship and teleport home.
Ice Planet
Head southeast to coordinates 73,83. When you arrive, you will find space sharks guarding the planet. You need to lure them into a trap. Shoot all of them to get them to follow you and then lead them to the black hole located to the north. The coordinates for the black hole are approximately 84,47. When you’re luring them away, keep them close enough to stay on screen or they will go back to guarding the ice planet.
Once the space sharks have been dealt with, you can land the ship on the Ice Planet. When you exit the ship, you’ll be standing on a platform above ice water. Just like the lava from the Fire Planet, if you fall into the water, you’ll be teleported back to your ship. Move from platform to platform while watching out for the flying robot fish. It’s a little tough to move from platform to platform and you will slide a bit because it’s ice. You should aim for the middle of each platform when jumping so that you don’t slide off when you land.
In the next part, jump up on the platforms to climb the mountain while avoiding the giant snow balls. This part is much easier than the ice platforms from before. Sir Gawain, the blue knight, is standing at the very top of the moountain. Talk to him and he will give you a special force shield. You will then have to fight a giant tiger-shaped helicopter that drops snowballs on you. Using the force field, you can bounce the snowballs back at him to damage the helicopter. You need to hit him three times. From time to time, ice shards will fly towards you and they will damage your shield, so watch out. If the shield runs out it will need to recharge and you will be defenseless for a while. Just avoid everything when this happens. After you defeat the tiger helicopter, the blue knight will appear and he will join you.
Go back into your ship and teleport home. Now you can go to the Crystal Gate…
The Crystal Gate
The Crystal Gate is an asteroid at the coordinates 11,82. You can go there once you have found all three knights. The the Crystal Gate is surrounded by an asteroid belt, so you need to be careful when you get near it. Once you land exit the space craft. Climb up the crystal mountain to the top where the 3 knights are waiting. Click on the sword that is stuck in the stone. You will open a small vortex that you can enter.
You arrive at the castle of the Binary Bard. Jump down to the bottom of the castle and speak with the princess. She will ask for the three powerful weapons you have brought and then she will take them from you. But once she does, she will reveal herself as the Binary Bard in disguise! He will then laugh at you and disappear.
There is a wall next to you. Click on it and it will become a puzzle. When you click on a square, it will stay the same but flip over the adjacent squares. The goal is to turn over all of the pieces. It’s a little tricky, but you should be able to do this puzzle with a little experimentation and practice.
The Final King Mordred Battle
Welcome to the final battle. This is really hard and takes place in two parts. Your health meter doesn’t reset between them, so you need to do the first part as carefully as you can. In the first part, you will fly around as Merlin the robot owl. Be careful to avoid the spinning discs and Mordred’s zaps and robot arms. The goal is to pick up the black bombs that Mordred drops on the ground and then fly above him. When they start blinking red, wait a few seconds and then release them so that they explode on him. When you get two bombs on Mordred he will zap and kill Merlin. (Sob!) Goodbye, Merlin!
Now comes the really hard part. Try to get Mordred close to the platform where the real princess is trapped. Then jump up on him and then up onto the platform. Stand on the edge and then do a big jump to either the left or the right. If you timed it right, you’ll land on one of the chandeliers. Now move yourself so you are in the middle. He will go underneath the chandelier and fire his laser at it. It will fall on top of him. Repeat this on the other chandelier and then you will destory Mordred. He will emerge again but the princess will finish him off.
Once that’s complete, the mission is finally over! You have rescued the princess and will receive the Astro-Knights medal. Congratulations!
______________________________________________________________________________________________
COUNTERFEIT ISLAND
Here’s a bunch of additional screenshots and highlights from Counterfeit Island.
Watching Balloon Boy on the TV in Poptropica Counterfeit Island
Hanging out with a mime in Poptropica Counterfeit Island
Inside the Police Station on Poptropica Counterfeit Island
Full Poptropica Counterfeit Island Walkthrough
Here is the complete walkthrough in text format for everyone who doesn’t want to watch the videos. It’s pretty long and took a while to write so I hope you like it. Please leave feedback in the comments section. Thank you!
Your Arrival On Counterfeit Island
Follow the map to Counterfeit Island. You’ll arrive by balloon right next to the museum. Start running all the way to the right and head to the Downtown area. When you arrive, the first store you’ll see is called Bobo’s Clown Store. Go inside. You’ll see several colored balloons inside. Click on the green one to pick it up and then leave the clown store.
EXTRA: you can jump up on the roof of the store to talk with Bobo the clown. He’ll tell you why he’s up on the roof. It’s not necessary to talk with him to complete this quest.
Now head all the way to the right and enter the Countryside zone. Walk a little bit further to the right and you’ll come across a crying boy and a young woman holding a red balloon. Click on the crying boy and you will give him your green balloon. Once he has it he’ll fly up and away into the air. Poor balloon boy! Oh well, he’s not your problem right now. Head back to the left to go Downtown and then run all the way to the left of that zone and go into Main Street. When you arrive at Main Street, go inside the Web Browser Internet Cafe. Once you’re inside, walk to the right and talk to the bearded guy wearing the hat and camera. He’ll tell you that he lost his tunnel tour tickets and that if you can find them, he’ll give you one. While you’re talking to him, look up at the TV behind you. It’s balloon boy on the news! Head back out of the cafe and then go to the right and go to Downtown.
Your next stop is the garbage can just to the right of the entrance to the underground tunnel tour. Click on the garbage can and a screen will appear showing all garbage inside. Click on each piece and drag it away from the center. Soon, you’ll reveal the lost tickets that are buried inside. Click on the tickets and they’ll go into your backpack.
OK, now run back to Main Street and enter the Web Browser Internet Cafe again. Go inside and stand next to the man who lost the tickets. Open up your backpack and find the tickets and then click on “Use”. The guy will thank you for finding them and just as he promised, he’ll give one back to you so that you can use it to take the underground tunnel tour. And that’s exactly where we go next!
EXTRA: On your way back Downtown to go to the underground tunnel tour, you can stop in at Bobo’s Clown Store again to pick up another balloon. I think it makes getting the torn picture in the tunnel a little bit easier, but this is optional.
OK, head back Downtown and go to the entrance to the underground tunnel tour. There’s a woman standing outside wearing a green beret. Stand next to her, then open your backpack and click “Use” on the ticket inside. Next, click on the gate behind you to start the tour.
The tunnel tour is very easy to do, because there’s just one path to follow. When you get to the bottom, you’ll see a lightbulb hanging down from a cable in the middle of the tunnel. Jump up onto this cable and climb to the top. You’ll see a torn piece of paper on top of another cable just to the right. This is part of the torn picture that you’ll need to unlock the secret door to the museum later in the quest. Climb all the way to the top of the cable and jump to the right. This is really easy if you’re carrying a balloon from Bobo’s Clown Store. When you pass over the torn picture, you’ll pick it up. Keep following the main tunnel until you see a stone staircase heading up out of a door. Follow the stairs to leave the tour.
The Mysterious Guy
Right after you exit the tour, you’ll meet a mysterious man standing next to the exit. He’ll tell you a story and ask you to get a job at the museum, then meet him in this same spot after nightfall. Now head up the sand to the right and you’ll see another torn piece of the picture. Pick this one up. Before leaving this area, run across the docks to the left and jump up to the top of the mast on the fishing boat to find your third piece of the torn picture. Now head back to Main Street and enter the museum.
Inside the Museum
Talk to the security guard inside the museum and he will tell you to go speak with the assistant curator. The assistant curator is up the stairs right above the entrance. Go up and talk to him. He will tell you that four paintings have been placed in the wrong wings of the museum and that he needs you to put them in their correct spots. In each wing, you can pick up one painting on the wall (the others won’t move) and take it somewhere else. Here’s where all the paintings should go.
- Move the painting from the cubism wing to the impressionism wing.
- Move the painting from the impressionism wing to the expressionism wing.
- Move the painting from the expressionism wing to the realism wing.
- Move the painting from realism wing to the cubism wing.
When you’re done placing all of the paintings, go back and speak to the assistant curator. He’ll tell you that you are hired and will take you inside the Forgery Detection Lab to begin your training. Speak to him and then he’ll tell you to select a station to begin your training. Click on the first desk to get started. Use the X-Ray device over each of the paintings until you find the one with the sketch marks underneath the painting. Use the arrows at the top to switch between the paintings and then click on the one you think is the real painting below.
In the next test, you’ll use a magnifying glass to try and figure out which painting is a fake. Look in the corners of each painting to find the signature and figure out which one is different than the others. That is the forged painting.
The third test is a photograph and you need to click on the area that shows it is a fake. Move up to the left to where the moon is and click on the dark side of the moon to prove that this photo is a fake. If this was really a picture of the moon, there would be no stars on the dark side of it.
Now move to the next station, where the museum does chemical analysis of paint samples. In this test, you select a paint sample and then it drops into the beaker. A red bar moves across and when it reaches a square, that square lights up with a color. Click on that color beaker above while the square is lit to add it into the test solution. If you do it correctly and in time, a green check mark will appear over the square. Keep going until all four squares are done correctly. Now repeat the whole process for the remaining two paint samples. Once you finish this test, your training is complete and the assistant curator will give you a key to the supply room.
Leave the forgery detection lab and walk right and then follow the signs to the statue room and security office. Walk left past the statues and follow the sign to the security office and supply closet. Walk all the way to the left and you’ll find the door to the supply closet. Use the key from your backpack to unlock it and get inside. Once you walk in, you’ll find the sixth and final piece of the torn picture, which will complete to form the image of a gargoyle head.
Now walk back to the right and go back through the statue room. Follow the sign to the main hall and then exit the museum. Now it is night time outside. Head left and go to the city docks. The mysterious guy in the had and sunglasses will still be standing where you left him. Go inside the gate to the underground tour area and then follow the tunnel back to the wooden ladder. Climb the ladder and then click on the hatch at the top. The hatch cover will appear on screen and it has a gargoyle face on it. Re-arrange the pieces on the hatch to match the version you see in the torn picture. All of the features have to match the picture exactly. When you’re done, the hatch will open and you can proceed up through it.
You’ll arrive inside the supply closet in the museum. Use your supply room key to unlock the door from the inside and then go into the hall. Watch out because the shadow of the security guard will walk by the window to the security office. Wait for her to go by and then run past the window all the way to the statue room door. Go inside and then move across the room carefully, avoiding the laser beams. You are safe from being spotted by a laser beam when you’re hiding behind something, like a statue or potted plant. Once you arrive at the far end of the room, exit to go to the main museum hall.
From here, go up and to the left to where the painting of the Scream is located. Click on the top of it and you will jump up onto the light hanging above it. All of the sudden the museum alarms will go off and the police will arrive. You’ve been framed! You’ll be placed in jail and then questioned by the police. You will take a lie detector test which is very easy to pass. Then you’ll be asked to join the chief inspector over at the museum security office.
On the way back to the museum office, stop inside Bobo’s clown shop, where you’ll find the security guard from the museum. Ask him what time he left his post and he will give you his time card. After you get it, head to the museum and go up to the security office. Once you arrive, walk to the right and click on the big computer. You’ll automatically check the security camera footage and because you have the time card from the security guard, you’ll know where to look. You will see the mysterious guy appear and walk up to the painting. Press the print screen button to get a surveillance video screen print. Then go over and talk to the investigator. She will tell you to show the picture to the people in town. Leave the museum and head right towards Bobo’s Clown Shop.
When you arrive outside the clown shop, show the surveillance video screen print to one of the mimes. The mime will pretend to play music, which is a clue that the mysterious guy you’re looking for is hiding in the jazz cafe. Go right and then enter the cafe. When you arrive inside the cafe, walk to the right and the mysterious man will be there. He will run away from you. Follow him to the right to begin a big chase.
During the chase scene, you’ll be riding on a scooter trying to catch the mysterious guy. You don’t really need to catch him during this part. All you need to do is avoid the different obstacles that appear in the road as you go by. The chase lasts for a minute or two and you’ll arrive at the Docks. The thief will escape in a waiting motor boat but will drop a key card which you will pick up.
EXTRA: keep an eye out in the beginning of the chase for Balloon Boy. He will appear up in the sky between the buildings in the background.
Your next stop is the museum. When you arrive in the main lobby, the assistant curator will be waiting for you and give you a package that arrived addressed to you. It’s a painting of Vincent Van Gogh’s Starry Night, and there’s also an x-ray device included. Open your backpack and click on the Examine button on the painting to take a closer look. Drag the x-ray device over the painting and you’ll see a secret message from the curator telling you to meet at the Pop Art Museum in Early Poptropica island. This is a fun part where you now have to leave Counterfeit Island and go to Early Poptropica. Head back outside and return to your travel balloon, which is just to the right of the museum entrance. Choose Early Poptropica on the map.
Walk left to the Pop Art Museum and then go inside. Walk a little bit to the left and you’ll find an older woman wearing purple clothes. Talk to her and she will explain a little bit about what is going on and give you a key. Exit the museum, go back to your travel balloon, and head back to Counterfeit Island.
When you arrive back in Counterfeit Island, run all the way to the right to the Countryside. You’ll see the Inspector’s house here and you can use the key that the Curator gave to you to get inside. Head upstairs and you’ll see a painting hanging on the wall. Click on it to remove the canvas and you’ll see that it’s hiding the stolen painting from the museum! But then the lights will go out. and you’ll be knocked unconscious.
When you awake, you’ll be deep inside an underground hideout. Both you and the mysterious thief will be tied to chairs and you are captives of the Black Widow, the world’s greatest art thief. The Black Widow will leave the room and then you and the mysterious guy will talk about how you were both set up by her. He’ll tell you to move your chair close to him so that he can untie you. To move your chair, click and drag your mouse to the left. It will slowly move towards the guy. Once you get next to him, you’ll both escape the chairs and he’ll suggest that you both go after the Black Widow. Head out of the room to the right.
You’ll arrive in the next room. Run all the way to the left and then jump up on the boxes while avoiding the guards. The hardest guard to sneak past is on one of the platforms right above you. You need to wait until he gets all the way to the left and then turns and starts walking right. Jump up immediately and follow him a few steps until you see a couch. Jump onto the couch and the springs will propel you to the platform above and to the left. Here you’ll see a special access panel. Use the key card you found when you were chasing the mysterious guy before to open the door. Go through the door to enter Black Widow’s private gallery. Then walk to the left to begin the final confrontation with Black Widow.
The mysterious guy will run and jump onto a platform with a handle. You need to turn the handle to raise the platform up so that he can catch her. But once he does that, the Black Widow will start dropping art onto the ground, destroying it. You need to catch the art to keep it from breaking while continuing to try and turn the handle to raise the platform. This is a really tough part to finish! If more than one million dollars of art breaks, you’ll fail and have to start this part over again. But after every four pieces you save, she’ll get really mad and then you have a few seconds to run over to the platform to turn the handle. But watch out because after a few seconds, she’ll throw a bomb towards you. You need to avoid getting hit by the exploding bomb and then return to the middle to try and catch four more pieces of art. Keep repeating the cycle until you raise the platform all the way to the top.
Once you’re done, the Black Widow will be captured! You’ll appear inside the Internet Cafe and the Curator will be there. She’ll tell you to meet her at the museum. Go there and then the Curator will show you that the museum has been the secret hiding place for some of the most famous works of art in the world. You’ll receive the medallion for finishing Counterfeit Island. Congratulations!
______________________________________________________________________________________________
REALITY TV ISLAND
Part One: Arrival and Main Street
Once you arrive on Reality TV Island run to the right and then go inside the TV World store. Jump up to the top platform with the enormous flat screen TV and talk to the guy there wearing the red hat. He’ll tell you to change the channel on the TV. Go ahead and then you’ll see an ad for the show giving an address to send applications to. Leave the building and then go inside Mike’s Market and walk to the right. There’s a guy wearing a tie there. Talk to him. He’ll say there’s less than 24 hours before the Reality TV Island show begins and then he’ll run away and drop the Pop-Topica magazine he is reading. Go ahead and pick it up from the ground. After it goes into your backpack, examine it and then click to the next page where you’ll find an application inside. Click on it and it will go into your backpack.
Now head out of the market and run over to the motel on the left end of the street. Go into the Motel Office. Walk over to the right and click on the cup full of pens. You’ll get one of the cheap pens in your backpack. Next, click on the magazine and turn the page to the local tv schedule. At the bottom of that page is an advertisement for Papa Pete’s Pizza. The phone number is 555-PETE (555-7383). Click on the phone on the desk (it’s next to the cup of pens) and dial the phone number for the pizza place. When they ask where you’d like it delivered, choose room 4B.
OK, now head back outside the motel and there will be a pizza delivery person standing outside (wow that is fast delivery!). She’ll tell you she forgot the room number, but you will take care of delivering it for her. Now go up to room 4B and click to knock. The foor will open and you can go inside. You’ll find a really sad looking guy named Bucky Lucas here. He is the famous star from the first season of the show. Click on him to speak to him and then choose the last option, “I could really use that grand prize.” He’ll tell you that money and fame are not all they’re cracked up to be. But more importantly, he’ll give you the stamp that you need to mail in the application! In fact, it’s a special edition stamp of him! Oh, and apparently postage in Poptropica costs $0.52 to mail a postcard!
Next, click on the application in your backpack and fill it out. You can write anything you want to for the reason of why you should be on Reality TV.
Now head back out of the motel room and then run over to the right where you’ll find a blue mailbox. Click on it and you’ll mail the application. Then you’ll reappear on “the next day” to find that there’s a helicopter on top of the motel waiting to take you to the show. You’re going to be famous. Click on the helicopter to fly off to the show and begin part two of Reality TV Island.
Part Two: The Competition
Now you’re in the main part of Reality TV Island, the actual show competition. This part works very differently from all the other islands on Poptropica. There’s no one way to do things and the challenges you get during the show are random. But the basic idea is to win every competition that you can because then you’ll be immune from being voted off the island. At the end of each competition, everyone gets to vote for someone else to get booted. The other contestants usually vote against a contestant that voted against them in the prior round. You can usually use this to strategize on who to “gang up on” in the voting rounds. So even if you don’t win each competition, you can often make it to the next round by being smart in the voting stage.
If you make it to the final two, then the winner of the last challenge wins the show. If you lose, you can return again for another season by clicking on the helicopter. And if you win, you can also play again the next season!
______________________________________________________________________________________________
MYTHOLOGY ISLAND
Help for The Hard Parts
You’ll find the full written walkthrough down below, but here are some answers to some of the frequently asked questions about Mythology Island. Having trouble? Post a question in the comments and I’ll try to answer it!
Getting the Pomegranate for Hades’ Altar
Before you get into the underworld of Hades to complete some of the tasks in your mission for Zeus, you’ll need to leave an offering of a pomegranate on the altar in Hades’ temple. A lot of people are having problems finding it. The pomegranates are in a tree in the Garden of the Sphinx, which is to the left and over the bridge from the Base of the Tree of Immortality. I wrote a whole post on how to get the pomegranates, but the short version is to jump up on the platforms above the sphinx and they’re yours for the taking.
Here is where you get the pomegranates that will allow you to travel to the underworld.
Getting Hercules to Help You
Hercules won’t help you until you have all five items from Zeus’ quest. Once you have the five items, bring them to Athena. Zeus will appear and steal them. The big jerk! Once this happens, talk to Athena and she will tell you that Hercules will help you. You’ll need to have the magic mirror from Aphrodite because Hercules doesn’t want to have to walk. He’s so lazy!
Getting the Hydra Scale
You can see how to do this in the videos, but basically you need to jump up when the Hydra is about to strike. He will rear one of his heads back to attack and his eyes will bulge out. When this happens, jump up in the air and then try to land on top of his head. That head will get knocked out. When all five heads get knocked out, the Hydra will be asleep and you can click on him to get one of the scales.
Thump goes the Hydra.
Getting the Whisker from Cerberus
You’ll need the reed pipe you used to get into the Minotaur’s lair. You’ll also need to learn a song from one of the statues inside Apollo’s temple, where you found the reed pipe. Click on the statue that is holding a reed pipe and she will teach you a special song. When you pass her test, you’ll get a card in your backpack that shows the notes to play. Go to the Underworld and walk up to Cerberus. Play the notes you see on the card using your reed pipe and the big three-headed dog will fall asleep. Then just click on one of his whiskers to get it.
Rock-a-bye doggie...
Complete Written Walkthrough
Here’s the complete written walkthrough with all the Poptropica Cheats for Mythology Island if you’re still having problems after watching the videos and reading the hard parts section. This guide walks you through the entire island, step-by-step.
- When beginning on Mythology Island, you will arrive via your balloon at Olympus Village, which is also the Main Street section for Mythology Island. The first this you should do is to walk inside the Museum of Olympus. Once you go inside, you’ll see a short story about the gods and how they defeated the Titans for control of Olympus. Look around and you can see all the statues of the gods in here as well. At the statue of Poseidon, you’ll see a starfish attached to his face (kind of gross). Take the Starfish off and it will go into your backpack.
- Now you want to head over to the Temple of the Muses, which is inside the Grove of Temples. It’ in the next zone to the right of Main Street. Go to the right side of the temple and there is a basket with free reed pipes. Take one. Next, carry it back to the room with the statues and click on the statue of the woman holding a reed pipe. She’ll teach you how to play a song on it. This is very important because you’ll need to know it later. But you also get a card in your backpack to help you remember the notes.
- Go back left to Olympus Village, and left again into the next zone to the forest with the Tree of Immortality. Climb the marble staircase and go up into the branches of the tree.
- Once you’re in the tree you need to get to the upper right. You can climb on the red snakes and jump over the tree branches. You’ll find a satyr standing on the tree up top. Click on him and he’ll ask you to collect honey. Collect 10 of the honey pots in 60 seconds and he will show you the way to the Golden Apple.
- Go and get the apple. Once you do, thunder and lightning will appear and the satyr leaves. Zeus shows up and he’s pretty angry with you for taking the apple. But he says if you do a quest for him to retrieve five items in Mythology Island, he will spare your life and grant you immortality. A scroll will appear next to you and you should take it. It will reveal the five items you need to locate. They are: a flower from the garden of the Sphinx, the ring from the nose of the Minotaur, a scale from the Hydra, a giant pearl, and one of Cerberus’ whiskers.
- When you leave the tree and go back down to the base, you’ll meet Athena, who has been disguised as an old woman. She’ll give you a warning that her father, Zeus, may not be telling you the truth. She also promises to help you on your quest and tells you that you can use the olive trees you find for clues.
- Next go left and over the bridge. You’ll arrive in the Garden of the Sphinx. The next part is to get the water in the aqueduct to flow to the dying flower by using the switches and gates up above you. When you’re successful with the water from the aqueduct, you can pick up the flower. Then jump up to the platform above the Sphinx and take the pomegranates from the tree because you’ll need them later.
- Use the Reed Pipe at left, playing the eight colored notes on the wheel that opens the Minotaur cave. blue-blue-green-yellow-yellow-red-blue-green
- Go inside and speak to the Minotaur, and next enter his Maze. Athena arrives and gives you a glowing thread to help keep you from getting lost. Your first stop is the ghost of Pan. Head to the right past the weapons and then down and back up to the right. After a while, you’ll arrive next to him. When you get to the wall with the bones puzzle, remove the extra bones to spell out the word TEN. Keep going and watch out for the scorpion that is here. Just jump over him to get past. You’ll arrive at a doorway, go through to get to the snake puzzle. Click the red-eyed snake when it appears three times. This is one of the hardest parts of Mythology Island.
- When you finish the maze, talk to the Minotaur and he will give you his ring. Now you need to return to Main Street. Keep moving to the right and enter the Grove of Temples. Run past the Temple of the Muses and you’ll soon arrive at the temples of Hades which is down below and Poseidon over to the right. You can do either one first, but in this walkthrough, we’ll start with Poseidon’s temple on the far right.
- Go inside Poseidon’s temple and put the starfish you got earlier onto the altar.
- Now you can proceed into Poseidon’s realm. Enter and run left on the beach until you meet Aphrodite. She has a test for you. It’s like the game of Hangman and you have to guess the different gods. The gods are Ares, Hermes, Aphrodite, Artemis, and Hestia.
- Swim out in the water to the statue and then dive down underwater. There are extra oxygen bubbles, but the direct path is across the top, then down the right side, and left along the bottom. Before entering the Hydra’s lair, go up a bit to recover the Giant Pearl.
- The Hydra here has five heads. To defeat her, jump up just as each head is attacking you and then land on top of it to knock the head out. After you knock out all of the Hydra’s heads, you can get the scale. Exit using the mirror to reach Aphrodite heart symbol, and walk back right to go to Hades.
- Outside the temple, you’ll see lots of graffiti. There’s a worker outside and he’ll pay you a drachma to clean up the graffiti. Help him out and get paid for your work.
- Go inside the temple and place the pomegranates on the temple, which is over to the right. A door will open. Jump right into the chasm to reach the River Styx.
- You’ll cross the river in Charon’s boat and you need to avoid al the things that come flying at you. The best way to do that is to stand exactly where Charon is. Jump over or duck under the flaming skull and leap over the river alligator.
- Once you arrive on the shore, use your reed pipe to play the song you learned in the museum. The notes you need to play are on the card that you got, but here they are: blue, green, yellow, blue, red, green. Once Cerberus falls asleep from the music, you can get his whisker. You cannot move the large rock blocking the Throne Room. Now you can return to the Gate of Olympus on Main Street with the help of the mirror.
- You’re almost finished with the quest now that you gathered all five of the items you require. Go to the left to the base of the tree and Athena will be waiting. She will help you unscramble the special message that the five items contain. The message is, “Whoever wields the five sacred objects will rule all of Poptropica.” Now Zeus arrives and he betrays you. He takes all of the items you found for himself and says that by midnight, all of Poptropica will fall under his rule. Athena tells you to speak with Hercules for help. He agrees and you go to the Hades throne room using the mirror that she gave you.
- Hercules uses his incredible strength to push the boulder aside so that you can get into Hades’ throne room. He’ll wait outside while you go in to speak with Hades. Hades agrees to help, and gives you his crown.
- Use the mirror to travel to the Poseidon lake. Underwater, Hercules opens the rock passage to the Throne Room, and Poseidon gives you his trident to assist in your upcoming battle with Zeus.
- The next step is to use the mirror one more time to travel to the gates to Olympus on Main Street. The gates are locked shut, but that’s no problem for the strong and powerful Hercules.
- Once you arrive, the Medusa appears and she turns Hercules into a statue. Alas, poor Hercules. At least his good looks have been preserved for eternity!
- Using the drachma that you earned from cleaning up the temple to buy a bag of wind from Aeolus at the base of the mountain. You can use the bag of wind to fly up onto the mountain, and then jump and climb further to get to the top, where you’ll find the throne of Zeus. Now light up all four of the statues of Zeus. He will be summoned and then will fight you in the final battle.
- This fight is difficult but simple in concept. You fly around, avoiding Zeus’ attacks while you try and shoot him. Hit Zeus and his health meter will go down. If he hits you, you lose power, as indicated by the pink clouds that hold you up. Don’t lose all of your clouds or Zeus will be triumphant and you will need to battle him again. Gather the little pink clouds as you fly, to replenish the larger cloud.
- A few moments into the heat of the battle, Zeus will start to glow and throw spinning white balls of energy. You need to watch out for these, too. He is only vulnerable to your attacks when he is not glowing. So make sure you concentrate your attacks for these times.
- After 6 to 10 sets of balls, you should have hit him enough to win the battle. After losing, Zeus gives you back the items from your quest. Athena shows up too and presents you with your island medallion. Congratulations, you have completed Mythology Island!
SKULLDUGGERY ISLAND
(I'AM SORRY THE WALK TROUGH IS IN VIDEO WALKTROUGH)
______________________________________________________________________________________________
STEAMWORKS ISLAND
(I'AM SORRY THE WALKTROUGH IS IN VIDEO WALKTROUGH)
______________________________________________________________________________________________
GREAT PUMPKIN ISLAND
Run down Main Street to the right and head to the Pumpkin Patch, where you’ll find Linus and Lucy. Linus will ask you to help find the heaviest pumpkin in the patch. You have a timer and need to drag the heaviest pumpkin onto Lucy’s picture before time runs out. The quickest way to do this is to pick any two pumpkins and put them on the scales. Remove the lighter one and drop it off to the side so you don’t accidentally pick it up again. Then keep putting pumpkins on the scale, always removing the lighter one. After you’ve gotten through all the pumpkins, the one remaining on the scale is the heaviest, so drag it over to Lucy.
Next, Lucy and Linus need you to roll the pumpkin back to their house. This launches a challenging mini-game where you push a pumpkin along hills and obstacles. There are several spots where it can drop off or get hit by something and be destroyed. If it breaks, you’ll get sent back to a starting point (either the very beginning or the last flag marker you passed). The toughest part is near the end, where three kids are on swings. The best strategy is to get the pumpkin into position right next to the first swinger and then as soon as she passes you while swinging backwards, run and push as fast as you can all the way through. You and the pumpkin will end up safely next to Lucy.
Next you’ll go inside the Van Pelt house (Van Pelt is Linus and Lucy’s last name). Linus will give you a trick or treat bag. Lucy will carve the pumpkin and then the screen fades out to “Later that Day.” Charlie Brown and Linus have a quick conversation with you and then Linus starts to write a letter to the Great Pumpkin. Once this is over, run outside into the street and find Pig Pen. Give him the trick or treat bag and he’ll give you a lemon flavored Sucker. HEad back inside the Van Pelt house and give the lemon sucker to Linus. He’ll leave and then you can grab the pen he leaves behind on the desk. Now run outside.
Run left through Main Street to Charlie Brown’s backyard. There you’ll find Charlie Brown and Snoopy over by Snoopy’s doghouse. Talk to Charlie and then you’ll play a game as Snoopy where you have to blow leaves that fall from a tree onto the leaf pile. You need to move five leaves over to the pile to complete the game. You move left and right with your mouse and then click to blow up into the air to keep the leaf aloft. It takes a little getting used to because normally in Poptropica you click to move. Once you finish, Linus will arrive and jump into the pile of leaves. He’ll then walk away to go mail his letter to the Great Pumpkin.
Now run back to Main Street and you’ll find Linus next to the mailbox. Click on him and he’ll ask where his security blanket is. Now head back to Charlie Brown’s backyard and click on the pile of leaves. Move your cursor around really fast in a circular motion to blow all the leaves out of the way and then click on the blue blanket when it appears. Take the blanket back to Linus and he’ll use it top open the mailbox and mail the letter.
OK, now head back to Charlie Brown’s backyard once again (there’s a lot of running back and forth on this island!) and you’ll find Charlie Brown and Lucy playing football. Charlie wants a signed agreement from Lucy before he kicks it. Give him the pen you found on Linus’ desk when he asks for it. He’ll try to kick the ball but Lucy takes it away at the last second and he falls flat on his back. They’ll leave and then you can pick up the football. Go back over to where Snoopy’s doghouse is and stand under the tree. Use the football to kick it up into the branches, where it will knock down Snoopy’s aviator cap.
Now begins the whole Snoopy part of the quest. The first game is where you are Snoopy flying on his doghouse trying to avoid the Red Baron (who looks a lot like Woodstock!) The main strategy here is to fly around in loops and avoid the Red Baron as much as possible. You especially want to stay clear of the bombs he drops. Stay alive for one minute and then you’ll make an emergency landing behind enemy lines. The next part is where you run across the countryside at night while trying to avoid being spotted by the searchlight. This is a lot like the laser beam part in the museum in Counterfeit Island. You just need to run to the right and stop at each obstacle that you can hide behind. When the searchlight passes back to the left, run again to the next hiding place. When you reach the house, jump up on twice to get onto the roof and hide behind the chimney. Then drop down to the right and you’ll be standing next to a scarecrow. Take the mask off the scarecrow and walk to the right where you’ll find the entrance to the Halloween Party.
Inside the Halloween Party, you’ll find a bunch of different games that you need to win. The first one is bobbing for apples. This is very easy. Just click on one apple at a time when they appear. As soon as you get five, you win. The next game is where you carve a pumpkin using the back of Charlie Brown’s head as a model. All you need to do here is trace the shapes of a jack-o-lantern and then you’ll see your handiwork carved on the pumpkin.
The next game is harder. Here you’ll see a jack-o-lantern move around and then the screen goes dark. You need to place the jack-o-lantern pieces so that they overlap as closely as possible where the jack-o-lantern last appeared. It’s a bit like pin the tail on the donkey. If your pieces are all close enough, you’ll win. Here’s a quick tip: when the jack-o-lantern stops moving, put your finger on the screen right where it’s nose is. That way, you can line up the pieces very closely.
The final game is a rhythm music game on Schroeder’s piano. You need to click on the piano keys just as the falling dota land on the squares above them, just like in Guitar Hero or Rock Band. As long as you get enough of them to keep the blue progress bar past the red line, Snoopy will dance. At the end of the song, if he’s still dancing, you win.
The party will come to an end and everyone goes out in costume for trick-or-treating. All you really need to do here is ring the doorbell at each house and then jump up and catch one piece of candy (get a different at each house). When your candy bag is full, the trick-or-treating is over.
Now head back to the pumpkin patch, where you’ll find Sally and Linus still waiting for the Great Pumpkin. Give the bag of candy to Sally, and she’ll thank you. Once that happens, you’ll see a pumpkin moving in the foreground. Is it the Great Pumpkin? Nope, just Snoopy! Sally leaves in disgust but Linus says he’s going to stay. You’ll offer to stay with them. Then as night progresses, Lucy will arrive and thank you for watching out for Linus, who is now fast asleep on the ground. She’ll give you the island medallion as a reward and then she’ll take Linus home. Congratulations! You completed Great Pumpkin Island. Good grief!
After it’s all over, you can still go back and visit with most of the characters.
Poor Linus.
Woodstock Follower
Members who log in during the Great Pumpkin Island early access period will get a special limited editionWoodstock follower as a prize. This is the best thing ever in Poptropica. Woodstock rules!
Poptropica Members who complete Great Pumpkin Island get a special Woodstock follower as a prize.
Scenes from Great Pumpkin Island
Here are a few screenshots from Great Pumpkin Island.

- It’s the Great Pumpkin, Poptropica!

- Linus explains the legend of the Great Pumpkin.


- Bet Linus wasn’t expecting the Great Pumpkin to look like this!

- Arriving in Great Pumpkin Island


- A classic Charlie Brown moment recreated in Poptropica.

- Snoopy vs. Woodstock, er, the Red Baron.

- Trick or Treating with the Peanuts Gang

- Is it the Great Pumpkin? No, just Snoopy.

- Arriving on Great Pumpkin Island

- Poptropica Members who complete Great Pumpkin Island get a special Woodstock follower as a prize.

- Poor Linus.
If you’re not familiar with the original TV special from the 1960′s here’s the link on IMDB: It’s the Great Pumpkin, Charlie Brown.
______________________________________________________________________________________________
CRYPTID ISLAND
(I'M SORRY CUZ MAYBE IT JUST A LITTLE)
FAQ for Cryptids Island
Here are answers to some of the frequently asked questions about how to beat Cryptids Island. This section covers some of the hardest and trickiest parts of the quest.
Where do you get the camera?
You’ll need a camera to get a picture of both Nessie and the footprint in the snow at the top of the Himalayan mountain. You get the camera in the Loch Ness area by helping the guy with the truck that is stuck under the bridge. Talk to him and then click on the tire. A screen will come up with a close-up of the tire. Move your mouse cursor rapidly around the air inlet for the tire to deflate the tires so that the truck can pass under the bridge. When you’re done, the man will give you his camera as a reward for helping him.
How do you trap the Chupacabra?
After you lure the spotted goats into the middle area in Puerto Rico, you still need to get a farmer’s help to trap the Chupacabra. To do this, go back to the first farmer you met. He’s the guy who loaned you the jeep down in the bottom-right corner of the map. The next time you visit him after herding the goats into place, he’ll say that he’s going to go trap the Chupacabra. When you return to the middle area on the map, he’ll be there with his truck and help you set the trap.
How do you see inside the house with the Jersey Devil?
You’ll need to visit both the Himalayas and Loch Ness before you can see inside the house where you find the Jersey Devil. The monk in the monastery will give you a lantern and you’ll find a book of matches to light it on the counter inside the Pub at Loch Ness. Once you have these two items, you can use the matches inside the Jersey Devil house to light the lantern and see. It’s still really spooky, though!
About Cryptids
You might be wondering what in the heck cryptids are. Well, they are creatures or plants whose existence has been suggested but not recognized officially by scientific consensus. So legendary creatures like Bigfoot, unicorns (they’re real, I swear!) or the Loch Ness monster are called cryptids. BTW, the Loch Ness monster being a part of the new island explains why a Scottish castle appeared as a sneak peek screenshot long before the island was officially announced.
Pre-Launch Promotions
Cryptids Island was announced to Poptropicans in a very mysterious fashion, befitting the theme of the island–strange creatures who are mysteries and whose existence cannot easily be proven. Before the island was officially announced, a quick promotional image appeared on the Poptropica home page.
But after just about an hour or so of being on the home page, it was mysteriously removed. And then on the official Poptropica blog, there was a strange and mysterious message from the Creators that mentions the leak but didn’t provide a straight answer about whether the new island was really going to be called Cryptids.
Finally, they made it official and Poptropica updated the main blog with a post saying that the official name of the new quest is Cryptids Island. They also created a new info page about it here. This is that the page has to say:
An eccentric billionaire is promising a big reward to whoever can prove the existence of cryptids — hidden creatures. The hunt is on for Bigfoot, Nessie, and other legendary beasts. But watch out: you’re not the only one in search of these monsters…and your competitors will stop at nothing to find them!
______________________________________________________________________________________________
WILD WEST ISLAND
Written Walkthrough
For those of you who don’t want to (or can’t) watch the video walkthroughs, here’s a written version that tells you step-by-step how to beat Poptropica Wild West Island.
Dusty Gulch and Diamond Plains
- As soon as you arrive in the entry place (Dusty Gulch) run to the right until you get to Rusty’s Ranch. Talk to the guy to help him train the horse.
- In this mini-game, you need to move your blue mouse cursor left and right to try and stay close to the white cursor that is moving around. This will keep the horse balanced and after a while you’ll win and get the horse and a special horse whistle to call him.
- Click on the horse to ride him and then head to the left to talk to the woman riding the horse near the beginning. She will give you a letter to deliver to Marshal Taylor in Diamond Plains.
- Go to the left and leave town.
- Now you’re on the overhead map. There’s a small mini-map in the upper-right corner that will show you where you are. Ride to the right towards Diamond Plains and go over one of the yellow badge stars on the ground to enter the town.
- Your first stop is the Marshal’s office. Talk to the deputy inside and he’ll tell you that Marshal Taylor isn’t here. He tells you to check the Saloon. Head to the right to go to the next area, where you can find the saloon.
- Go inside the saloon and walk to the right where you’ll find two guys spitting chewing gum into a bucket (gross!). They’ll let you play.
- In this mini-game, called Spit-N-Time, the object is to get your gum into the bucket. You move the arrow to select the angle and hold the mouse button down for more spitting power. A small arc appears and moves. Release the mouse button when it hits the center of the bucket. If you beat the other player, you’ll win and the guys will point you to Marshal Taylor who is sitting on the left. Note that if you try to talk to Marshal Taylor before winning this game, he’ll just be asleep.
- Go over and talk to Marshal Taylor. Read him the letter and he’ll give you his Marshal’s Badge. Congratulations, you’re now the Marshal!
- Now you need to go back to Dusty Gulch and talk to the guy at the photo booth. Because you’re now the Marshal, he’ll take your picture. Use the mouse to try and keep the camera steady and straight and when you do, you’ll have your very own photographic portrait.
- Now ride back to Diamond Plains and go inside the Marshal’s office. Click on the portrait in your backpack and select the Use button. Your picture will appear above the door and the deputy will give you the pea shooter gun that belongs to the marshal.
- As soon as that happens, there will be a jail break. It looks like Mustachio’s gang has arrived!
- In the next scene, you’ll need to chase the gang on the overhead map, but they’ll get away in a train tunnel. For now, it’s on to the next town in Wild West Island!
Dos Cactos and Rock Ridge
- Look at your map and head for the town of Dos Cactos. When you first arrive, you’ll be at the shooting contest.
- In this game, you compete against other shooters to hit targets. There’s a timer and whoever gets the most points in the time allowed wins. The first opponent is the Man With No Name. The next opponent is Young Kid. If you beat both of them, you’ll take on the Gunslinger. After him, it’s on to Old Gunslinger. Finally, you’ll go up against Miss Annie Oakley, who is a tough and fast opponent to beat.
- Once you beat Annie, you’ll win the competition and they’ll give you an upgraded gun, the Spud Gun. Potatoes are way better than peas!
- Now head to the right and jump up the huge cactus. At the top is a casino. Go inside.
- Walk upstairs and talk to the guy up there. He’ll tell you to play a game of Slap-Jack.
- If you’ve never played it before, the game is simple. You take turns putting cards in the middle of the table. Whenever a Jack appears, the first person to slap their hand down on it wins all the cards in the pile. If you slap another card by mistake, you lose one of your cards. Whoever evnds up with all the cards at the end is the winner.
- After you win, the guy there will give you a treasure map showing where to find gold.
- Leave the casino and go down to the right. Talk to the guy with the big head. He’ll tell you he needs the rare blue tulip to shrink his head down to normal size.
- Now leave town and ride southeast to Rock Ridge. When you arrive, talk to the guy with the cows. He’ll tell you that he needs you to find and catch his calf. He’ll give you a lasso to help.
- Leave town and follow the trail of horseshoe marks. You’ll see the calf shortly. Now chase after him and lasso him when you can. This is just like the sneak preview round ‘em up game. Press the space bar once to start twirling the lasso and then press it again to release. Once you catch the calf, lead him to the ranch (it’s on your map) and then return to the guy in Rock Ridge.
- He’ll give you an old saddle as a reward. He’ll also ask you for another favor, which is to capture five cows that have wandered off. This is how you get the rare Rattlesnake Wrangler outfit. But we’ll get that a little later…
- Run to the right and you’ll see R.J. Earl’s wagon, where he’s selling elixirs and mixtures. Watch as he gives a guy a vanishing potion. Then run to the right and talk to the guy at the bank. He’ll tell you that El Mustachio Grande is planning to rob his bank. Now leave town and ride back to the ranch. Look around to find the five cattle and rope them the same way you did with the calf. Lead each one back to the ranch. When you have caught all five, go back to the guy in Rock Ridge and he’l give you the Rattlesnake Wrangler outfit.
- Leave town again and ride all the way back to the starting town, Dusty Gulch.
Trading for Gold, Oil and Elixirs
- The first stop here is the trading post. Go inside and jump up to the top. Trade your old saddle for a Gold Pan.
- Leave town and ride to the spot in the East on the treasure map you got from the guy in the casino.
- When you get here, you’ll use the gold pan to try and find gold nuggets in the river. All you need to do is to pick a spot that is sparkling and click on it to put your pan down. Then move your mouse cursor slowly back and forth many times to shake out the rocks and dirt. It may take a few tries, but eventually, you’ll find a gold nugget.
- Ride back to Dusty Gulch and go inside the Trading Post again. Now trade the gold pan for the oil can.
- Now ride East to Diamond Plains. Go to the right and jump up onto the clock tower. Go inside (the entrance is next to the guy repairing it). Work your way to the right and then up and over. You’ll need to click on the rope pulleys to drop the red iron girders so that you can pass. Once you make it all the way through, use the oil in your backpack to loosen up the gears. Click on each gear inbetween the two main gears and drop just enough oil so that each one is sparkly-clean. Then click on the turn gears button in the lower-right and the clock will be fixed!
- Leave the tower through the exit and then head right to the train station. You’ll see the train has arrived and it’s ready to go. But we’re not going to take it just yet. We need a little something from R.J. Earl first.
- Ride down to Rock Ridge and go speak with R.J. Earl. Open your backpack and use the gold nugget you found in the river. He’ll sell you all of his potions for the gold nugget.
- Now ride out of town and return to Diamond Plains.
Train and Mine Cart Rides
- Board the train and head for Dos Cactos. The first time you ride the train, you’ll play the Train Robbery game. This one is tough but the idea is pretty simple. You need to shoot the bandits that are attacking and prevent them from reaching the front of the train. They also shoot back, so you need to avoid them when they point their guns at you.
- The key to winning is to use the Concentration Carbonate in the lower left corner. This freezes everything until your next shot, making it very easy to hit the target. Use it, but do so sparingly because it will run out.
- After you defeat all the bandits, the train arrives safely.
- Now ride the train again and this time go to Rock Ridge. Go straight to the right to the mine.
- Before going into the mine, walk to the left and click on the canary. You’ll shoot your gun and frighten him, making him drop a key. Use the key to enter the mine to the right.
- Walk to the right and jump into the mine cart. This will start a long mine cart ride.
- During the ride, all you need to do is wait for the signal flags to appear and then click on them to shoot them. When you do the track will correct itself so that you avoid some nasty obstacles in your way. After several of the signals, you’ll arrive at the end of the mine track.
- Jump up onto the hill and you’ll find a Blue Tulip. Then a cave-in will start and you’ll appear at the bottom of a rope. Climb up the rope. Pay no attention to the cow in the mine cart.
- You’ll be up on the other side of Rock Ridge. Run over to the bank and jump up above the door frame, where you’ll find half of the map to the bandit hideout.
- Now ride your horse to Dos Cactos and speak to the guy with the big head. Use the blue tulip in your backpack to give it to him. His head will return to normal size and he’ll give you the second half of the map to the hideout.
- The hideout now appears on your main map. It’s on the left side, near the bottom. Ride out of town and head for the hideout.
The Bandit Hideout
- When you arrive, you’ll see the bandits nearby on lookout. Use the transparency tonic in your backpack to sneak past them and go inside the building.
- Inside, the bandits are all hiding behind things and can’t be shot. You need to shoot at the items above them, which will knock things from the wall down and force the bandits out of their hiding spots. For example, shoot the candle to light the rope on fire and shoot the shortgun on the fireplace mantle to force two of the bandits out. Then you can shoot them out in the open to knock them down.
- When you get all of the other bandits, El Mustachio Grande will jump out of his hiding place and flee. Now you can chase him on horseback.
- Follow him closely until you get to the river and then use your lasso to capture him when he stops.
- Lead him all the way back north to Diamond Plains. When you arrive, he’ll be in jail and Marshal Taylor will be there to congratulate you and give you the island medallion. Great job!
WIMPY WONDERLAND ISLAND
Written Walkthrough
Need help finishing Wimpy Wonderland? Here’s the full written walkthrough for the island, with step-by-step instructions on how to beat Wimpy Wonderland in Poptropica.
- First, talk to Greg Heffley, who is standing right near where you arrive on the island.
- Follow Greg back to his house.
- Go upstairs and get the address book in the bedroom in the upper-right corner.
- Go left into Greg’s bedroom and get the page from his journal which is on the floor next to his desk.
- Go into Manny’s bedroom through the door.
- Go out through the window, across the roof to the left and run left up the hill to Rowley.
- Talk to Rowley and then Manny appears on a rumble bike and runs past you.
- Run back down to the right after Manny and go to Main Street. Then go past the Fast Mart and you’ll find the rumble bike stuck in the snow. Pick it up.
- Manny is standing nearby, so chase after him.
- Manny will jump up a tree and then leap off. Jump back down after him.
- Pick up the carrot on the ground next to the snowman that was destroyed when Manny jumped out of the tree.
- Go right to the School area. Manny is here and he will jump up the windows outside the school.
- Run past the school entrance and push the garbage can there onto the left side of the see-saw.
- Jump up the pine tree and pick up the scrap of paper there.
- Climb up to the top of the tree and then jump down off the left side. You will land on the other end of the see-saw, causing the garbage can to fly up in the air and land on one of the lower roof-tops of the school.
- Go to the left side of the school building and then jump up to that roof. Then run over to where the garbage can is and push it all the way to the left.
- Next, jump onto the top of the garbage can and then from there jump to the top-left window, where you can enter the school.
- Walk a little to the left past the lockers, and Manny will be there. You will automatically chase him downstairs and he’ll run outside.
- Walk to the left to where the lockers are under the School Spirit sign. One of the lockers is clickable (it’s right under the R and I in “SPIRIT”).
- Turn the combination lock in the directions indicated by the arrow to the following numbers: 9, 37, 15. These are the numbers on the scrap paper you found in the tree.
- Inside the locker, you’ll find a Twisted Wizard game guide.
- Return to Surrey Street and go inside the Heffley home. Find Greg over by the TV over on the right and Use the Twisted Wizard game guide. This will help Greg beat the level he’s on. He’ll then give you the game to return to Rowley.
- Go outside and then up the hill to Rowley’s house. He’s now inside and can’t come out to play. If you try to go to the door, Rowley’s dad appears and won’t let you in.
- Instead, go jump on the car to set off the alarm. Then run and hide behind the bushes near the front door. When Rowley’s dad goes out to investigate, run inside the open door.
- Walk to the right to go into Rowley’s bedroom. You’ll give him the Twisted Wizard game and he’ll give you aJoshie Fan Club Membership Card as a thank-you.
- Now return to the Heffley home and walk to the left. Use the Joshie Fan Club Membership Card to open the locked door on the left.
- Go inside and examine the circuit breaker panel on the wall. Click the breaker for Roddick’s room to cut off the power to his stereo system.
- Roddick will walk out of his room and leave the house. Go into his room and pick up the dog dish on the floor. Then follow him outside.
- When you get outside, you’ll discover that Roddick’s van is now gone and you can access the garage. Go inside the garage.
- Jump up and get the leaf blower hanging on the wall. Then leave the garage.
- Walk up the hill to the snowman. Use the carrot you found to give the snowman a nose. Someone is inside the snowman and will say ouch!
- Now use the leaf blower to blow the snow away and Fregley will appear. He’ll give you Frederick, his Bingo Troll as a token of gratitude for getting him out of the snowman.
- Now run to the right, and go through Main Street and the School area until you arrive at Leisure Towers. Run to the right and jump up into the tree, which will bounce you up to the next floor. Go up from here to start climbing the outside of the building.
- In the next part, you need to jump up the window sills while avoiding the old people who open up the windows. If someone opens a window while you’re standing next to it, you’ll get bounced off. Try to jump up all the windows until you get to the top right one, number 33C. Go inside this window.
- Click on the old guy in the chair to wake him up. This is Gregory’s grandpa and he has seen Manny. He’ll only tell you after you eat salad with him.
- In the salad game, all you have to do is click your mouse really fast to eat the salad while grandpa tells boring stories. Your goal is to not throw up. Just keep clicking really quickly until the salad bowl on the right is empty and your tummy is full.
- Grandpa will tell you he saw Manny on the security camera, and you’ll see a video of Manny riding on someone’s motorized scooter outside.
- Walk to the right, go out the door and then walk to the left to get into the elevator. Press the button for the Lobby.
- Now walk to the left and go out to the front of the building. Then run to the right to get to Whirley Street, home of the notorious Whirley Street Kids.
- Jump and move to the right, trying to avoid the snowballs they are throwing at you. All you have to do is reach the snow shovel which is a few steps to the right. Once you get it, go back to the left and leave the area.
- Run to the left until you get to Gramma’s Street. Run left past the laundromat up to the house.
- Stand in the driveway and then Use the snow shovel in your backpack. This will start the snow shoveling game.
- In this game, all you need to do is click to pick up the snow and then drop it over on the right side. You must clear all the snow from the driveway before your body temperature gets too cold.
- Once you clear the driveway, Gramma will leave in her car to go play Bingo at Leisure Towers.
- Run to the right and head all the way back to Leisure Towers. Go inside the lobby and then into the room on the right, where Speed Bingo is being played.
- To play the game, walk up to the empty spot at the table and then click on the troll in your backpack, which you can use as your bingo blotter.
- Numbers will roll across the top. Use the blotter to mark the spot on all three of your cards whenever you have a match. You’ll need to move quickly and mark any matches before the number rolls off the right side of the tray.
- When you win the bingo game, you’ll get the grand prize: a soothing sounds classical music CD.
- Exit Leisure Towers and run to the left, returning to Main Street.
- Go inside the Fast Mart and use the classical music CD. Then click on the music player on the wall and turn the volume to the max. That will chase away the teenagers hanging outside.
- The store owner will give you a bottle of No-Freez wiper fluid as a reward.
- Go back to the school and run up to the guy in front of the snow plow. Use the No-Freez wiper fluid in your backpack. This will start a new puzzle game.
- You need to produce exactly four liters using the 10 liter bottle, a 5 liter cup and a 3 liter dog dish.
- Click on the 10 liter bottle and fill the 3 liter dog food dish. This will leave 7 liters in the bottle.
- Next empty the contents of the dog food dish into the cup.
- Now pour the contents of the bottle into the dish again, leaving 4 liters in the bottle. Easy peasy!
- The snow plow driver will leave to go to the convenience store to get some coffee.
- Run to the left and return to Surrey Street. Go inside the Heffley house and open the curtains next to where Greg is playing video games. He’ll stop playing and say that Manny was probably looking for his blankie.
- Walk outside the house and you’ll see Manny driving the snow plow!
- Follow Manny up to the Laundromat and then go inside.
- Manny will be sitting next to the change machine next to Tingy, his blankie. Click on him and Greg will appear.
- Greg will tell you that everyone needs to get home before his mom gets home from work, but then the Whirley Street kids arrive on the scene.
- Help Greg push the snowball to clear the path and knock over all the Whirley Street kids.
- Next sled home to get back to the Heffley house in time. Greg will give you the island medallion for helping him find Manny!
RED DRAGON ISLAND
(I'AM SORRY THE WALKTROUGH IS IN THE VIDEO WALKTROUGH)
______________________________________________________________________________________________
SHRINK RAY ISLAND
Written Walkthrough
Arrival and Science Fair

Go to Shrink Ray Island on the main Poptropica map and you’ll arrive on Main Street and land on top of a slide and swing set. You can head to the left to enter the multi-player room, which is the Sweet Dreams Candy Shop, but for now you want to head to the right and go inside PS 101, which is holding the River City Science Fair.
- Enter the school through the double doors next to the sign.
- Run to the right and go through the doors with the Science Fair sign.
- Fun Fact: you can click on the water fountains as you pass by to make them squirt water.
- Once you’re inside the science fair, run past all the exhibits until you get to the right. If you want, you can check out the different exhibits, which include The Sixth Sense in Calamari, Balloons, Fashion, and Electricity,Chocolate Volcano, Candy and Soda Propulsion, Evolution of the Belly Button and an empty exhibit at the far right end near the stage. Go to this last exhibit and talk to the guy standing there.
- The man is Mr. Silva, the science teacher, and he’s worried that his star pupil, CJ, is missing. The two people on the right are CJ’s parents. Talk to them and CJ’s dad will tell you to go look for her at their apartment on Avenue A.
- Head back out of the school and go to the right to enter the Avenue A zone.
Avenue A and CJ’s Apartment

When you arrive on Avenue A, you can head all the way to the right side to get to CJ’s apartment. It’s the one with the orange cat outside the door and a telescope inside the window. Inside, you’ll see that CJ and her family are kind of messy!
- Click on the door to enter the apartment. The cat will follow you inside.
- Follow the cat from room to room to try and chase it back out. After it leaves the bathroom, it will go back outside the door.
- Go into CJ’s bedroom, which is on the left side of the apartment. Click on the microscope that is on her desk next to the computer.
- A masked man will come in the room. He looks like he’s right out of Wild West Island. And he’s carrying a shrink ray gun! He’ll tell you he’s going to put a stop to your snooping around and will chase you to the left side of the bedroom.
- You’re cornered! The bad guy uses the shrink ray gun on you and you’re shrunk down to a miniature size!
CJ’s Apartment: I’ve Been Shrunk!

This is the main part of the quest. You’ve now been shrunken down to miniature size and need to find out how to get back to normal size, catch the thief, and rescue CJ!
- Run to the right, jump up onto the shelves, and then jump to the right on top of the fan. It will start to drop down. When it’s done, press the red button to start it and it will blow away all the dust bunnies under the bed, revealing the thumb drive underneath.
- Turn the fan off, and jump up and over it. Then go under the bed and pick up the thumb drive.
- Run to the right to get to the next part of the bedroom and then go right again to enter the living room.
- Watch out for the cat’s paw when you run past the living room door. Jump up in the air as you run past.
CJ’s Apartment: The Kitchen

This is one of the most complicated parts of the entire quest. You need to do a lot of different steps to navigate through the kitchen and get the remote control on top of the refrigerator.
- Head right one more time to get to the kitchen. When you arrive, you’ll see there’s a remote control on top of the refrigerator, but getting to the top is going to be more complicated than you might think.
- Run to the right until you see some open drawers above a green and yellow sponge jump up on them and get the screwdriver. Then jump up onto the counter and run to the right to get to the next part of the kitchen.
- There’s a piece of notepaper here that you need to get and it’s on the far right side on top of a table. Getting there is a bit tricky!
- First, push the rolling pin so that it knocks the teapot onto the other burner. Then run up and jump into the steam coming from the teapot. It will lift you up to the shelf with the flour and sugar.
- There’s a bottle of oil here. Push it over onto its side so that it starts dripping out.
- Drop down to the floor and then push the cat’s food bowl so that it’s under the dripping oil from above.
- Next jump back up onto the counter and then jump up and down on top of the cat food bag several times to make lots of food fall out. You should jump on it at least 4-5 times.
- The food and oil will stick together making a little stepping stool out of the cat food that you can use to get up on the table. Next, push the cat food bowl to the right so that it is underneath the table.
- Jump up on top of the cat food and then up onto the table top. Walk to the right to pick up the piece of paper. Also, pick up one of the purple grapes, which you’ll need for the next task.
- Drop down to the floor and run to the left to get to the first part of the kitchen.
- Jump up on the counter and run over to the toaster. Click on the plug to plug it into the socket.
- Jump onto the toaster handle while holding the grape and stand there for a few seconds. The toaster will heat up and then the handle will pop up, sending you flying up into the air. You’ll land on a shelf with a spatula, a cup full of utensils, and a salt shaker.
- Push the salt shaker to the left so that it’s on the very end of the spatula handle. Then jump up onto the cup and then jump to the right so that you land on the other end of the spatula.
- Hold still and let the salt shaker fly up in the air and come back down. When it lands, it will make you fly up in the air. Jump a little up and to the left as you fly through the air and you’ll land on top of the refrigerator, where you can now pick up the remote control.
- Now head to the right and push the green and yellow sponge next to the Power Clean spray bottle on the floor. Jump on the sponge and then onto the top of the bottle. Finally, jump to the top of the garbage can and go inside it. (Gross!)
- Once inside, you need to solve a puzzle by moving certain objects, like tuna treats cat food cans and blocks of cheese. Objects that can be moved are clickable. First click on it, and then click on either the right or left green arrows to move it. Be careful: if you move an object that was holding up others you want to watch out that everything doesn’t fall on top of you!
- First push the can of tuna treats near the entrance to the right.
- Then jump down and pull the cheese to the left.
- Go back up and push the milk to the right. Then jump down on top of it.
- Next push the cheese above you on the shelf to the right.
- Walk over it and pull the tuna can to the left.
- Stand on on top of the can and jump up one shelf so that you’re standing right next to the tuna can above. Push it to the left to give you running room. Jump up and to the right.
- Pull the tuna can on the bottom to the left then jump on it and finally jump up to the right to get the Torn Page.
- To leave quickly, click on the green restart button in the lower left.
- Run left to leave the kitchen and head to the living room.
CJ’s Apartment: Living Room

Here fishies! Have some food!
We’re getting close to the end. In this part, you need to get CJ’s Diary Key out of the fish tank. You can’t just jump directly in the tank because the fish will bump you out. We need to distract the little fishies!
- Run over to the toy truck and then use the screwdriver from your backpack. This will remove the battery from the truck.
- Jump up onto the table top, stand next to the TV remote, and then use the battery from your backpack. Then jump onto the green button on the remote to turn the TV on.
- Now jump up onto the TV and climb the antenna to build up a static electricity charge. You’ll see white sparkles all over you.
- Then jump up to the left to the green ballon. The static electricity charge will attach you to the ballon and you’ll float up and to the left. You will land safely on the frame of the Poshville Boardwalk picture on the wall.
- Jump off to the left, and you’ll land on the shelf with the fish food. Push it to the left so that it tips over and drops food into the fish tank.
- The fish will start eating the food and will be distracted so that you can jump into the tank and take the key.
- Jump out of the fish tank onto the floor.
Return to CJ’s Bedroom

Now that we’ve got the diary key, it’s time to head back to CJ’s bedroom and find the next clue.
- Go left to CJ’s bedroom and then jump up on her desk. Open your backpack and use the thumb drive to put it in the computer. You’ll need to enter the password. The correct password is m4r13 cur13. Marie Curie is CJ’s hero and you should replace the i’s with 1′s, the a with a 4 and the e’s with 3′s.
- The blueprints for the shrink ray gun will be uploaded.
- Jump up again to get on the shelf with the Rubik’s Cube and her green diary.
- Use the key in your backpack to open the diary.
- Use the torn page in your backpack to complete the ripped part of the diary and you’ll get a message from CJ. It sounds like the thief is close by!
- Now jump on the thermostat and make it spin to red so that the heat turns on.
- Jump down onto the desk and stand next to the microscope. Then use the piece of paper from your backpack to put it down on the desk.
- Jump up onto the lamp and then bounce up and down a few times to bring it down closer to the paper. When it won’t go down anymore, click the light switch to turn it on.
- The heat from the lamp reveals the secret message from CJ that was written in lemon juice on the paper. It says, Look for me in the telescope. School coordinates.
- Now go to the left to the next section of the bedroom.
- Knock over the wastepaper basket and a bunch of paper will fall out and then rise up in the air from the heat coming up through the vent.
- Use the papers as jumping platforms to get up on top of the bed. Then pick up the morse code key from the top of the bed.
- Jump over onto the telescope. Then stand on each dial and spin them to the following coordinates: x – 87 andy – 16.
- Now look through the telescope. CJ is inside the classroom at PS 101 and she’s sending you a message in morse code. Use the key to decipher the message and click each letter as she sends them to you. The full message is: flush the thumb drive.
- Leave the bedroom and head for the bathroom.
CJ’s Apartment: Bathroom

This toilet is disgusting!
The bathroom in CJ’s apartment is kind of disgusting. Good thing we only need to spend a short time here. The goal is to get past the bathtub and over to the toilet so that we can flush the thumb drive.
- Run to the left and jump up on the drawer handles to reach the counter top.
- Jump onto the hair dryer and stand on the back end so that it tips up. Then click on the red button to turn it on.
- Leap into the stream of hot air and then you’ll end up on top of the shower curtain rod and move to the next part of the bathroom.
- Drop down onto the soap dish and push the bar of soap off to the right. Jump down into the tub.
- Go to the right and climb up the rope. Then stand on the faucet handle and run to spin it and turn the water on. The water will fill up the tub so you can swim over to the floating bar of soap.
- Jump onto the bar of soap and from there jump onto the rubber duck’s back.
- Now jump out of the tub to the left.
- Jump onto the red plunger and onto the stack of toilet paper. Then leap up to the toilet bowl.
- While standing on the bowl, use the thumb drive in your backpack to drop it inside.
- Next jump onto the flush handle to send the thumb drive on its merry way.
- Finally, head back the way you came to leave the bathroom.
CJ’s Apartment: The Great Escape

Yee-haw! We're outta here!
Now we need to get out of the apartment, which is going to be challenging because we’re still shrunken. Here’s how to do it!
- Go all the way back to the telescope in CJ’s bathroom and set it to the same coordinates (87,16). Peek into it again and CJ has a new message for you.
- The new message reveals the villain. It reads, thief is Mr. Silva.
- Now we need to escape the apartment and rescue CJ!
- Go back to the living room and take the battery out of the remote control. Then put it into the toy truck.
- Get in and drive the toy truck left into CJ’s bedroom.
- Get out of the truck and jump up onto CJ’s bookshelf. Go to the top where you’ll find a book called, Tess’s Treeby Jess M. Brallier. Push the book off the shelf to make it land and form a ramp that your truck can go over.
- Fun Fact: Jess Brallier is one of the Poptropica Creators! He is the publisher and general manager of the game.
- Jump back down and get in the truck. Drive over the ramp and you’ll see a short cinematic where you drive up and through the glass window out into the street.
Rescue at PS 101

Now we’re off to rescue CJ and stop Mr. Silva once and for all.
- You’ll start playing an easy overhead mini-game where you need to drive the truck down the street while avoiding obstacles. The ride lasts a little over a minute and it very easy to complete.
- You’ll end up inside the window of Mr. Silva’s office in the school. Run to the left and there’s CJ!
- Unfortunately, Mr. Silva shows up and he’s trying to shrink you into oblivion. Now you need to avoid the ray gun.
- The next sequence is a lot like the World War I sequence with Snoopy in Great Pumpkin Island. You need to hide behind objects when the ray gun appears so that it shrinks the object instead of you. Move to the left across the floor. You can either pause behind each object or skip every other one (if you’re quick enough). If you get hit by the ray gun, you have to start over.
- When you reach the reticulated quartz sample and Mr. Silva shrinks it, jump up onto the yearbook on the left and then immediately jump onto the desk above. Then quickly hide behind his microscope.
- After he shrinks the microscope, run right to the base of the globe. Mr. Silva will shrink it and the globe will fall off to the floor. Jump down to the floor and hide behind the books.
- Wait for him to shrink the books, then push the globe under the chair. Jump up onto it and then leap to the chair and to his desk. Land behind the apple and lunchbox.
- After he shrinks the apple and lunchbox, run all the way to the right until you are hiding behind the mirror.
- When Mr. Silva tries to shrink you this time, the shrink ray reflects off the mirror and hits him! He shrinks himself and falls into the ant farm jar, where he’s trapped!
- CJ appears and tells you to flip the switch to grow. Walk over and click the switch and then you’ll both return to normal size.
- You’ll be back at the science fair, standing with CJ and her parents. Her new exhibit is on display and it’s called,The Incredible Shrunken Man. Looks like CJ won first prize for the exhibit and you get the island medallion for solving Shrink Ray Island. Congratulations!
MYSTERY TRAIN ISLAND
Written Walkthrough
Prefer a written walkthrough for Mystery Train Island? Here’s a step-by-step guide that will show you exactly how to win.
Arrival on Mystery Train Island
Pushing the luggage up the completed ramp in Mystery Train Island.
- When you arrive, jump down and run to the left until you see a man pushing his luggage. This is Thomas Edison, the famous inventor. He needs your help getting his luggage loaded onto the train.
- Talk to him and then a puzzle mini-game will appear. Re-arrange the suitcases so that they line up left to right from smallest to largest. Then click on the plank of wood to create a ramp. You will push the luggage up into the cargo car of the train. So much work!
- Thomas Edison will give you a train ticket to ride the John Bull from Washington, D.C. to Chicago.
- Run over to the right until you get to the train door next to the Chicago World’s Fair poster. The cursor will say Ride Train. Hop on board!
On Board the Train
Don't look at the hot dog guy. He didn't steal it!
- Your first task is to talk to all the famous passengers on the train. The first is Ferris, the inventor of the Ferris wheel. He’s upset and will give you a copy of a telegram he received that says the wheel needs more power to work.
- Next run left and talk to Nikokla Tesla, who is standing outside of his cabin door.
- Then go inside Susan B. Anthony’s cabin and speak with her. She’ll give you a Women’s Suffrage Pamphlet.
- Go back outside and run to the left to talk with Gustav Eiffel. Then continue left until you come to a door marked with the name, Erik Weisz. Go inside and talk to the man there.
- Head back out and run to the left through several train cars until you reach a guy wearing a hat and a pencil in his ear. He’s a reporter from the New York Times. Talk to him and he’ll complain that the fair is second-rate because it’s in Chicago.
- Now go into Mark Twain’s cabin and speak with him.
- Leave Twain’s cabin and go to the left. You’ll pick up a pencil that’s lying on a table as you run past.
- Skip past Thomas Edison’s cabin and go into Mlle. Moreau’s room. Speak with her to hear her talk about how much better the World’s Fair in Paris was. She’ll give you a copy of her newspaper, Le Monde.
- Now you’ve met with everyone you need to. Go into Thomas Edison’s cabin and talk to him.
- He’ll tell you about his latest invention, a device which captures moving pictures. He’ll suggest that you try it out and once it starts working, he’ll leave to get the reporter from the New York Times.
- A cut-scene will appear showing the train heading into a tunnel.
- The room will go dark and when the lights come back on, the projector is missing! Thomas Edison and the reporter arrive and want to know what happened.
- Now you have to clear your name and find the person who stole the projector.
The Investigation Begins
- For the rest of the quest you’ll be tracking down different clues. To see the available clues, click on other passengers to speak with them and a box of your clues will appear. First click on Thomas Jefferson and then click on the device in the clues box to hear him talk about how his invention was going to win the prize at the fair. Next, click on the New York Times reporter. He’ll give you a new clue about Mark Twain and a secret compartment.
- Leave the room and go to the right. Enter Mark Twain’s cabin. Click on him to talk to him and then select hisportrait in your clues area. He’ll deny even having a secret compartment. Next, you can click on the panels on the wall to find the one that is hollow. There is a secret compartment, but it only has his manuscript in it. It’s his manuscript of Huckleberry Finn.
- The next thing that happens is that the train comes to a stop. You can go outside and talk to the people there. Click on the reporter and he’ll tell you about a clue outside his door. You’ll appear back on board the train, up by the engine.
- Walk to the left and go to Susan B. Anthony’s cabin. Talk to her and she’ll give you a clue about Nikola Tesla being locked in his cabin.
- Keep going through the cars until you get to the one with the reporter standing outside his cabin. You can talk to the other passengers as you go to get more clues.
- Talk to the reporter and click on the device. He’ll ask you if you found out more about the device in Twain’s cabin but it was a dead end.
- Walk to the left and click on the spots in front of Thomas Edison’s door. They are prune juice stains.
- Go to the left and talk to the train porter. Click on the glass of prune juice. He’ll tell you that he can’t tell you what the other passengers ordered. He throws away the order sheet and leaves, but his notepad is still on the counter. Take the notepad, and then use the pencil. Move it back and forth to reveal the imprint left behind. Keep scratching it until you completely reveal Tesla’s name and order. Looks like he had prune juice!
- Run to the right until you get to the luggage car. There’s a trunk on the floor with a black handprint on it. Click on the handprint to get another clue. There are coal smudges on the trunk. As soon as you find them, though, someone throws a pair of scissors at you! Pick up the scissors and put them in your backpack.
- Go all the way to the coal car at the front of the train and talk to the coal man. Click on the coal smudges clue and he’ll confess that he left to go get a snack, but says he didn’t go near the luggage.
- Return to the porter, who is now in the car with Thomas Edison’s room. Talk to him and select the coal man clue. The porter will confirm the coal man’s alibi and that clue will be eliminated.
- Head to the right and go back into the luggage car. The reporter from Le Monde will be here. She’s standing next to the trunk with the coal smudge on it.
- The reporter tells you to dress up like the porter, so head to the right and go into the porter’s closet. His outfit is in the room. Use the costumizer to put it on
- Go back outside and run to the right until you get to Tesla’s room. Knock on the door and he’ll let you in.
- Click on Tesla to talk to him. He’ll ask for a refill of prune juice. Grab the pitcher sitting on the dresser to the left and then keep refilling his glass.
- Soon, he’ll need to use the bathroom. This gives you a chance to search for clues in his room while he’s gone. Click on random objects in the room. You can see Tesla leaving and going to the bathroom in a picture-in-picture window above. I tried clicking everywhere and I think the game is rigged so that you always find the key at the last possible moment: just keep clicking around. Anyway, you’ll get the Luggage Key.
- Leave Tesla’s room and go back to the trunk, where the Le Monde reporter is still standing. Use the key on the trunk and you’ll find the device inside. It looks like Tesla has some explaining to do! The Le Monde reporter leaves to go get the security guards.
- The Pinkerton Detective arrives with Tesla. It’s funny because he comes in from the left but Tesla was just in his room on the right. How did that happen?
- The porter arrives too and asks you to return the device to Edison.
- Edison is grateful for the return of the device but doesn’t believe Tesla stole it. Together, you review the film on the device and you’ll get a Grainy Picture in your backpack. It shows that Tesla was on the other side of the train when it went around the turn and entered the tunnel. He must be innocent!
- Leave Edison’s cabin and go to the right. Go back to the luggage car and jump up through the open hole onto the roof.
- Run to the right on top of the train, while avoiding the obstacles by jumping and ducking. You’ll get a brief warning about upcoming obstacles with flashing red boxes.
- Jump down on the last car to talk to Tesla, who is being held captive in the coal car.
- He’ll give you a sketch of his cabin that he made so that you can compare it to what it looks like now and see if there’s anything different.
- Run left and return to his cabin. Once inside, open your backpack and examine the sketch. Click on the use button and then click on the pencil that appears in the lower left corner.
- Circle the trunk in the lower right corner. You’ve won the mini-game!
- Go back to the left and return to the luggage car. Jump up onto the roof again, avoid the obstacles, and return to Tesla in the coal car.
- Talk to Tesla and you’l get a new clue about the open luggage. Now go to the left again and enter Erik Weisz cabin. Talk to him about the luggage clue and he’ll talk about how an expert would be able to open it. You’ll get a new clue about Eric Weisz and his odd behavior.
- Leave and run to the left. Talk to the newspaper reporter about Eric Weisz. He’ll mention how there’s something odd about him and then he’ll give you a copy of the New York Times newspaper. Examine it to read an article about Harry Houdini. Now go back to Eric Weisz’ cabin.
- He’ll be gone, but now a lock pick bag will be on the floor. Walk over it to pick it up and put it in your backpack.
- Eric Weisz will appear and you will confront him about how he is really Harry Houdini. He jumps up and climbs to the top of the train. Follow him and try to catch him while avoiding the obstacles.
- Drop down into the storage car and click on the large curtain covering a box. Houdini is trapped inside. Looks like the master of escape needs your help!
- Use the lock pick bag to help him. Click on each of the locks and then click and drag the lock picks with the matching symbols to open it. You need to push each lock with the matching pick so that it rests on the red line. Do this for each of the padlocks.
- Houdini is rescued! HE tells you he’s not the thief, howecer. He proves this by telling you that someone stole one of his lockpicks. He tells you to find out what Tesla was hiding and that will lead you to the theif.
- Run to the right until you get to the luggage car. Jump up through the hole to the roof one more time and run across the roof to get back to Tesla in the coal car.
- Click on Tesla and he’ll offer to tell you what he was hiding if you free him. Use the lockpick set to open up his handcuffs.
- He’ll tell you he was carrying a small transformer capable of generating an enormous amount of wattage and that only this device would provide enough electricity to power the ferris wheel. He’ll also give you a sketch of the transformer. The mystery deepens!
- Run back to the left until you get to Mark Twain’s cabin. Go inside and talk to him. He’ll tell you to speak with the mysterious fellow in the last car.
- Leave Twain’s cabin and run left to the rear of the train. You’ll get to the Pinkerton Security car.
- Once here, jump up onto the first platform and walk left. Drop down onto the middle platform (where the bucket is hanging) and then run left and drop down past the guard, who is napping. Proceed to the caboose on your left.
- Inside you’ll find a man with a moustache. He turns out to be Grover Cleveland, the President of the United States!
- Together, you’ll put together the full mystery of what happened. Click on the following clues in order: glass of prune juice, coal smudges, key, Tesla’s briefcase, transformer sketch. President Cleveland tells you to return to the luggage car and take a closer look at the luggage to find out who the real thief is.
- Run back to the right to get to the luggage car. When you arrive, use the key in your backpack to open the suitcase with the coal smudge. Inside, you’ll find a bunch of things from France.
- First, talk to Gustav Eiffel, who is French. But he’ll point out the handkerchief inside belongs to a lady. The thief must be the reporter from Le Monde!
- The train stops. Go out and the Le Monde reporter will be here.
The Great Chase
- She’s got the transformer and plans to ruin the ferris wheel by destroying it. She runs off to the left.
- Follow her, while avoiding the obstacles in your path and the guards who are after you.
- The first obstacles are the hungry lions and the jugglers. You need to jump onto the lion’s mouths while they’re closed. Timing is very important. Jump to each one just as they close their mouths.
- After passing the lions, jump up onto the overhangs above each door. You can bounce over the jugglers this way.
- When you get to the snake charmer, wait for the snake to lower and then jump up on top of the basket lid to get a ride up. Then run past the belly dancers to the left.
- The Le Monde reporter runs off again and the guards come after you once more.
- Jump from totem to totem until you get to the last one. The guards will knock down the totems and then you will get to the last area: the ferris wheel!
- Now jump up the ferris wheel to the left, climbing up the ropes as you go. Look for the little blue highlights to show you where to jump. If you get stuck, watch the video walkthrough!
- When you get to the top, the Le Monder reporter is there. She will throw the transformer down. Jump to the rope on your left to swing over and catch it.
- Then go back to the top where the reporter is. She’ll fall down into Houdini’s water trap below. Jump down after her and then walk up to Ferris. Click on the transformer in your backpack and click the Use button.
- You’ve saved the day and the entire Chicago World’s Fair! You’ll get your island medallion and beat the island. Congratulations!
What do you think about the newest island? Fire away in the comments section below, or join the discussion in thePoptropica Secrets Forum!
Done with Mystery Train?
Looking for something fun to do? Play the Where is Dr. Hare? guessing game. Dr. Hare is hiding out all over Poptropica. By looking at a few screenshots, can you guess where he is? How well do you know Poptropica.Play the game now!
Looking for something fun to do? Play the Where is Dr. Hare? guessing game. Dr. Hare is hiding out all over Poptropica. By looking at a few screenshots, can you guess where he is? How well do you know Poptropica.Play the game now!
______________________________________________________________________________________________
GAME SHOW ISLAND
(I'M SORRY THE WALKTROUGH IS IN THE VIDEO WALKTROUGH)